Once you purchased your own domain, you may want to create some email addresses on it. Creating email addresses on your own domain is a premium feature of most email providers; here is some of the pricing we see.
You can run and email server yourself for free, and have email addresses for several separate domains appear within a single Gmail account. This is super convenient if you are running several domains. It is also useful if you want to provide business email service to others.
In this guide, we will set up email for the domain ‘techenthusiast.info’, and email addresses will look like <username>@techenthusiast.info. The tools are:
- A DNS provider such as GoDaddy
- Postfix, an open source SMTP server that is trusted
- dovecot, mailutils, telnet, and libsasl2-modules to help interact with Postfix
- A Debian Linux box with a static IP and high availability
- A TLS certificate for the ‘mail’ subdomain
- A personal Gmail account and a separate test account
- An AWS account
Here are the steps we will follow:
- Set Up DNS
- Set Up Postfix To Receive Email
- Check Postfix Logs
- Verify Your Server Can Receive Traffic on Port 25
- Configure Postfix
- Receive Email To Other Usernames
- Send Email To External Addresses
- Create a Verified Identity in AWS SES
- Request Production Access For Your AWS SES Account
- Set Up AWS SMTP Credentials
- Configure SMTP Relay For Sending Email
- Forward Email To Your Personal Gmail
- Enable Inbound SASL In Postfix With Dovecot
- Enable TLS in Postfix
- Enable Gmail To Send As Your Business Email
- Enable Additional Domains
- Monitor AWS SES Reputation Metrics
- Fallback MX Records
- Set Up POP3 With Dovecot
- Common Errors And What They Mean
Setting Up DNS
We need two DNS records,
- An A record for the ‘mail’ subdomain pointing at our server’s static IP

- An MX record pointing at the ‘mail’ subdomain

Under ‘Name’ we enter ‘@’ which mean the email addresses will be ‘@techenthusiast.info’. If you want a subdomain like ‘@biz.techenthusiast.info’ you would put ‘biz’ as the name instead. Note the priority is set to 0. We can have multiple MX records, and the one with the lowest priority will be given preference. This can help ensure high availability of your mail service. We can check that the DNS preferences have been broadcast into other DNS servers by running:
host -t a mail.techenthusiast.info
host -t mx techenthusiast.info
After a few minutes I was able to resolve DNS as expected.

Set Up Postfix To Receive Email
We can install postfix on our Debain Linux box with the following:
sudo apt-get install -y postfix telnet mailutils libsasl2-modules dovecot-imapd dovecot-pop3d
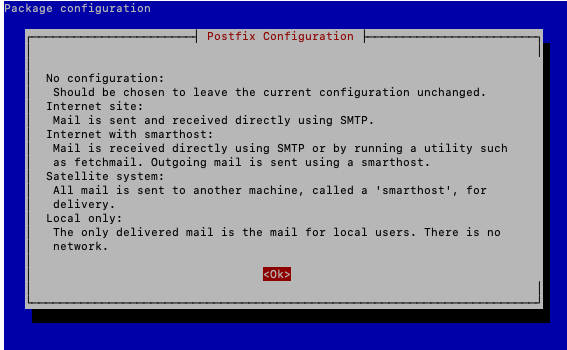
On Debian 12, the following box appears. Press Left Arrow to highlight ‘<Ok>’ in red, then ‘Enter’ to move forward.
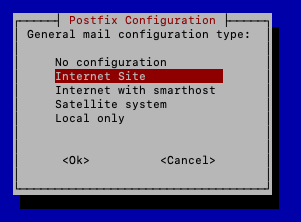
In the next screen, ‘Internet Site’ will be selected by default. Press ‘Enter’.
In the next screen, Postfix will have a default System mail name set to your server’s hostname (cat /etc/hostname). This is okay to keep for now. This will not prevent you from sending and receiving mail from other domains. Press ‘Down Arrow’ to highlight ‘<Ok>’ in red and hit ‘Enter’.

The installation should complete without errors. Let’s check the status and version of postfix.
sudo postfix status
sudo postconf -d | grep mail_version
sudo ss -tulpn | grep :25

The responses tell us that
- Postfix is running
- Postfix is version 3.7.6
- Postfix is listening on port 25
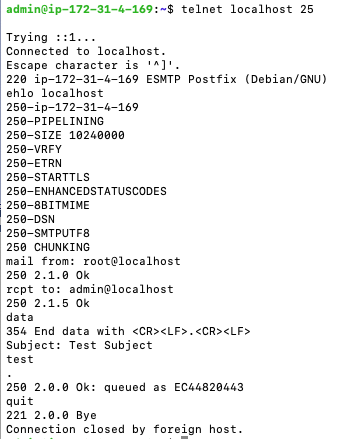
To start testing, we can send an email from localhost to localhost.
telnet localhost 25
ehlo localhost
mail from: root@localhost
rcpt to: admin@localhost
data
Subject: Test Subject
test
.
quit
Here is what the flow looks like in command line.
By default, mail received is present in the file ‘/var/mail/<user name>’ as a single file. Let’s take a look and see if the mail was received.
cat /var/mail/admin
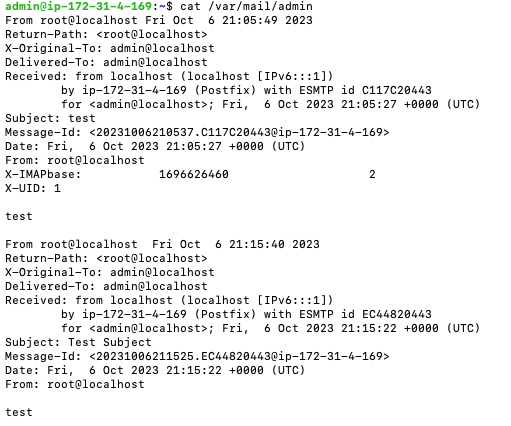
Looks like it was. Note that there are two message here, one that I sent previously. Another way to check your mail is to run the ‘mail’ command, which we installed via ‘mailutils’.
mail

You can press ‘Enter’ to go through the messages, and ‘q’ to quit out. Note that once you view them though the ‘mail’ command , they will be erased from ‘/var/mail/admin’ and moved to ‘/home/admin/mbox’. Now, let’s see if we can receive email from the outside.
Check Postfix Logs
Assuming that you have set up syslog on Debian (sudo spt-get install -y rsyslog) you should be able to check postfix logs by running
sudo tail /var/log/syslog -n 200 | grep postfix
This is really useful for debugging. For the email we sent in the previous step using telnet, you should see a log line like this.
2023-10-07T02:50:51.811331+00:00 ip-172-31-4-169 postfix/local[21927]: 4D865202C7: to=<admin@ip-172-31-4-169>, orig_to=<admin@localhost>, relay=local, delay=11, delays=11/0.01/0/0, dsn=2.0.0, status=sent (delivered to mailbox)
Verify Your Server Can Receive Traffic on Port 25
From an external terminal window, run
telnet mail.<your domain> 25
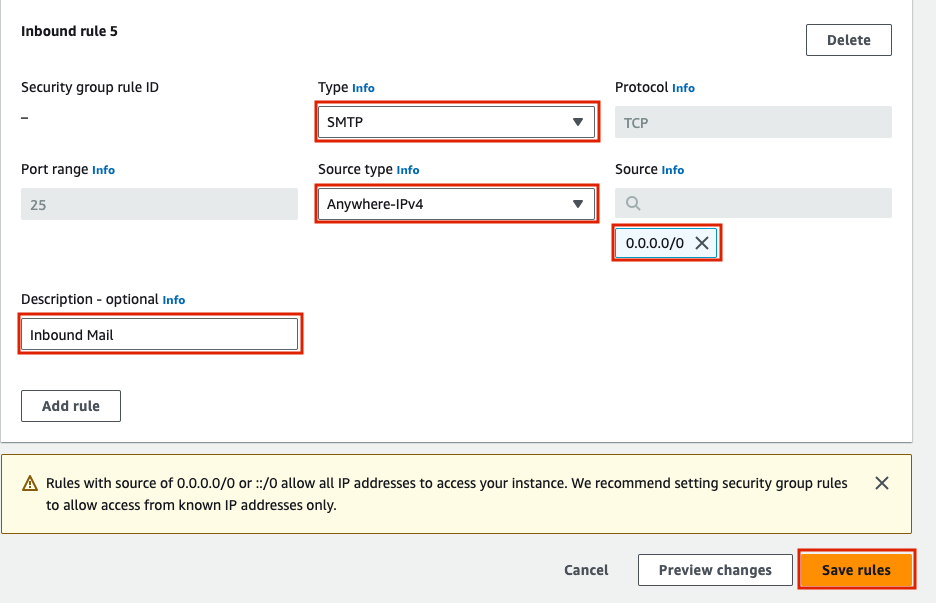
If you are seeing that telnet was unable to connect to remote host, be sure that your firewall/security groups allow inbound SMTP traffic on port 25. If you are using AWS, the security group inbound rule to add looks like this.
Configure Postfix
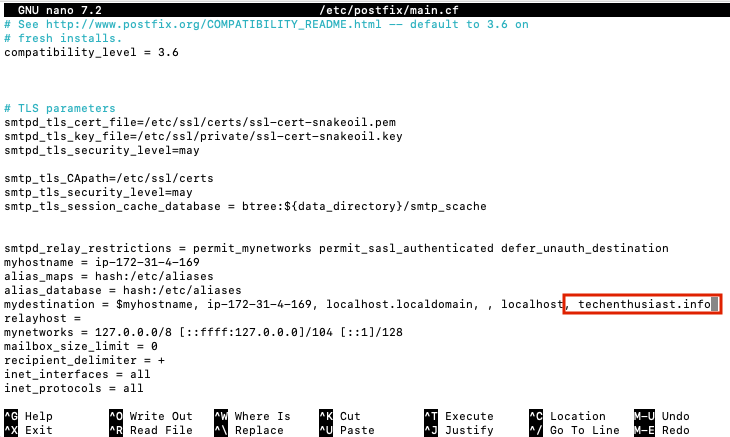
The main configuration file for postfix is at ‘/etc/postfix/main.cf’. After making changes where, we will need to run ‘sudo systemctl reload postfix’. While we can use the ‘postconf’ command to add and remove lines from ‘main.cf’, it is easier to just modify main.cf directly using nano. Here is what my main.cf looks like directly after installation (cat /etc/postfix/main.cf), yours should be similar, except for the value of ‘myhostname’. First, let’s add <my domain> as a destination, so we can receive email sent to this domain.
sudo nano /etc/postfix/main.cf
Add ‘, <my domain>’ to the end of the value for the parameter ‘mydestination’.
To save and exit nano, press ‘Ctrl + o, Enter, Ctrl + x’. Now, we need to have postfix reload the configuration
sudo systemctl reload postfix
Note that a restart would also work, but by doing only a reload, we are avoiding any downtime in the postfix service while still applying the changes. Now, we can send an email from a test email account, in my case this is. a separate gmail account ‘elliotmacneilletest@gmail.com’.

Give it a minute, but soon enough you should see a new message when you run ‘mail’.
mail

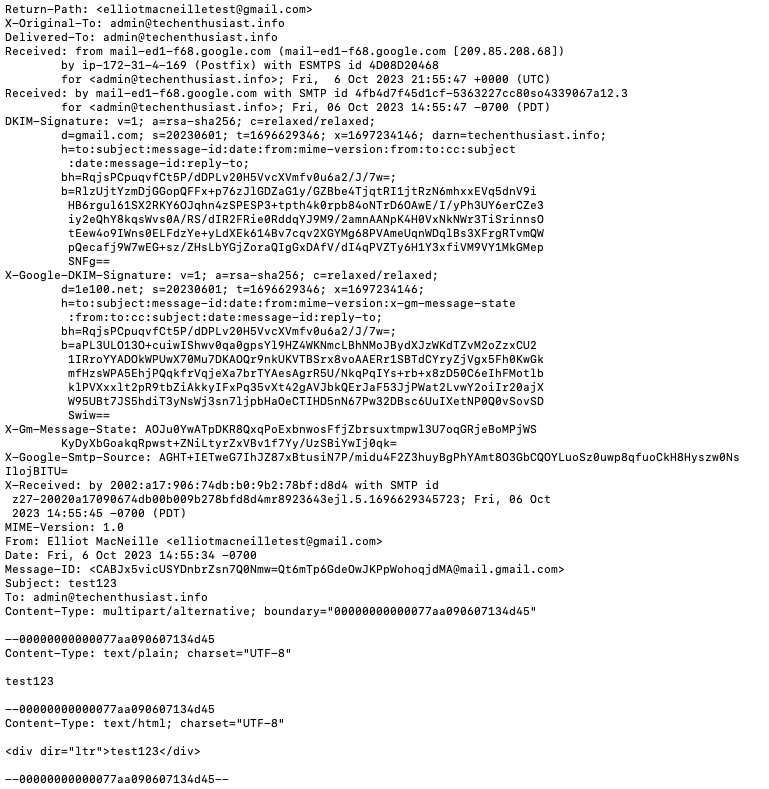
Inside the message, you’ll see headers that come with the email. If you used gmail, there will be headers for DKIM. You can see the entire test email received here.
Receive Email To Other Usernames
So far, we can receive email to ‘admin’ and any user on this Linux box. However, if we try to send to another username, we will see a log line like this
2023-10-06T22:16:06.778486+00:00 ip-172-31-4-169 postfix/smtpd[17830]: NOQUEUE: reject: RCPT from mail-ed1-f68.google.com[209.85.208.68]: 550 5.1.1 <elliot@techenthusiast.info>: Recipient address rejected: User unknown in local recipient table; from=<elliotmacneilletest@gmail.com> to=<elliot@techenthusiast.info> proto=ESMTP helo=<mail-ed1-f68.google.com>
We may not want to create a new linux user every time we create an email account. So, we can use a postfix feature called the virtual alias table to map all incoming mail on our email domain to the linux username ‘admin’. This is referred to as a ‘Catch All’ configuration.
sudo nano /etc/postfix/virtual
Enter in ‘@<my domain> admin’ and hit ‘Ctrl + o, Enter, Ctrl + x’ to save.

Now, to have postfix compile the virtual table, run
sudo postmap /etc/postfix/virtual
You should see a new file within /etc/postfix named ‘virtual.db’.
ls /etc/postfix

Finally, add two lines to ‘/etc/postfix/main.cf’
sudo nano /etc/postfix/main.cf
Add the following lines:
virtual_alias_domains = techenthusiast.info
virtual_alias_maps = hash:/etc/postfix/virtual

Press ‘Ctrl + o, Enter, Ctrl + x’ to save and exit nano. Finally, reload postfix.
sudo systemctl reload postfix
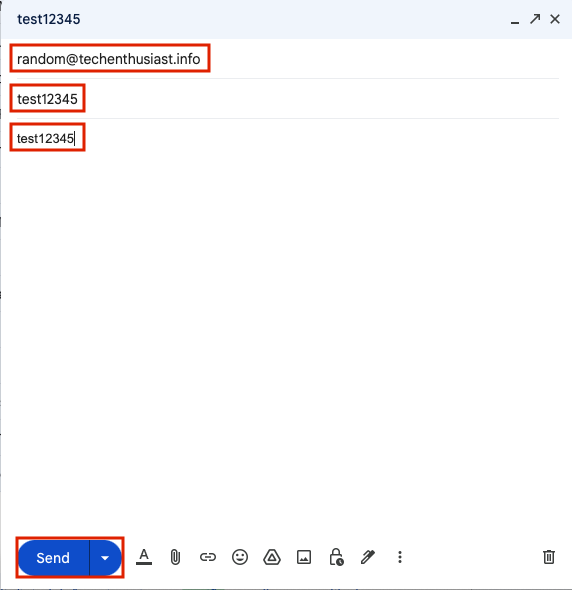
Now, you should be able to send from gmail to any username @<my domain>. For example, here I am sending to ‘random@techenthusiast.info’ from my test Gmail account.
And, that mail was received in the ‘admin’ mailbox.
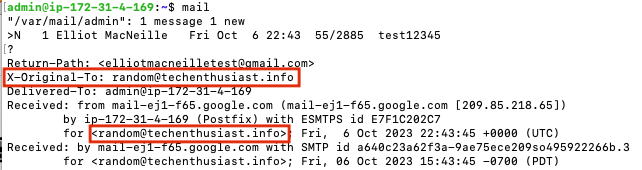
And, in ‘/var/log/syslog’, we can see a log line that looks like this.
2023-10-06T22:43:45.963341+00:00 ip-172-31-4-169 postfix/local[18511]: E7F1C202C7: to=<admin@ip-172-31-4-169>, orig_to=<random@techenthusiast.info>, relay=local, delay=0.02, delays=0.01/0.01/0/0, dsn=2.0.0, status=sent (delivered to mailbox)
Send Email To External Addresses
Now that we can receive email, we want to be able to send it as well. You can use telnet to try to send a message; let’s see what happens.
telnet localhost 25
ehlo localhost
mail from: admin@localhost
rcpt to: elliotmacneille@gmail.com
data
Subject: Test Subject
test
.
quit
After a few minutes, the email still hasn’t arrived in my personal gmail account. If we check the syslog, we see:
sudo tail /var/log/syslog -n 200 | grep postfix
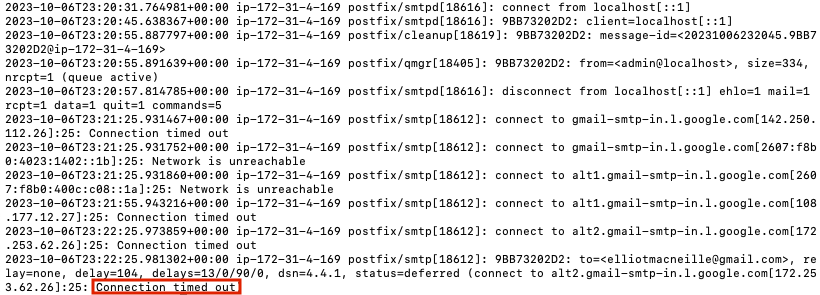
What has happened is, Gmail maintains a whitelist of SMTP servers that are allowed to send email to it. It will not accept connections from random IPs like a server I just created. This is one way SMTP providers work together to prevent spam. In order to move forward, we need to create an account with an SMTP relay provider that has gone through the trouble of whitelisting their IPs. Here are some options with their free tier pricing.
I will be using AWS SES, which allows 3,000 sent emails for free each month for the first 12 months, explicitly allows marketing emails, and is part of the AWS environment that this server is running on. More detailed pricing for AWS SES can be seen here.
Create a Verified Identity in AWS SES
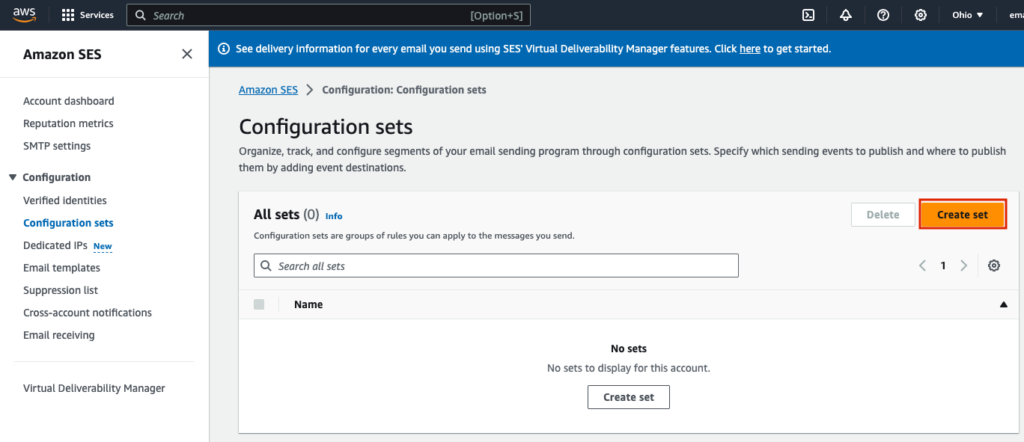
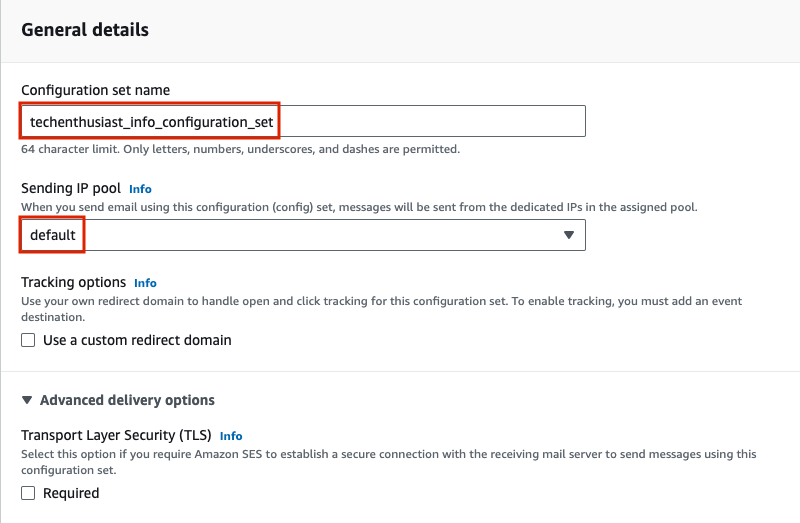
Log in to your AWS Account and navigate to SES Configuration Sets, here for us-east-2. Click ‘Create set’.
Under ‘General details’, give the set a meaningful name, and leave other settings as they are.
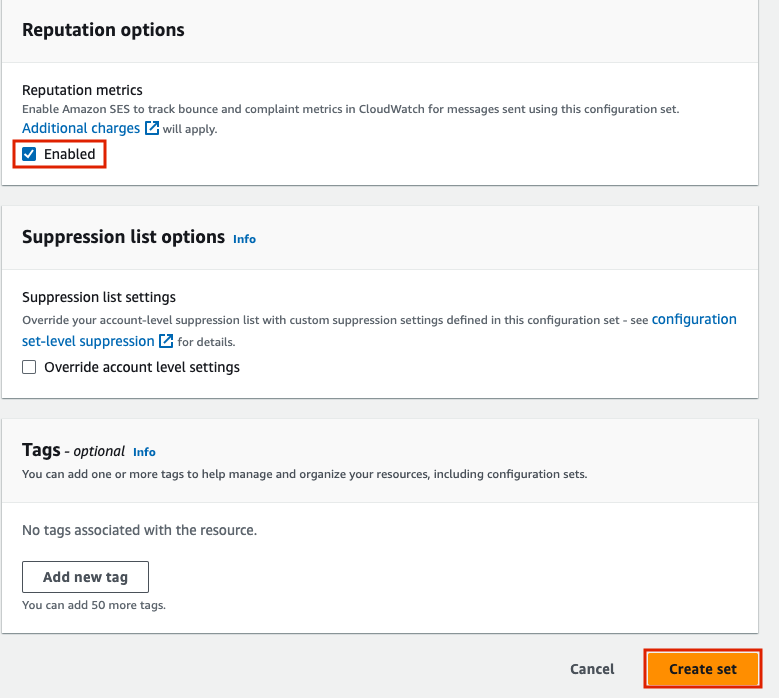
Under ‘Reputation options’, I recommend enabling ‘Reputation metrics’ to help monitor if your email campaigns are too spammy. Finally, press the ‘Create set’ button.
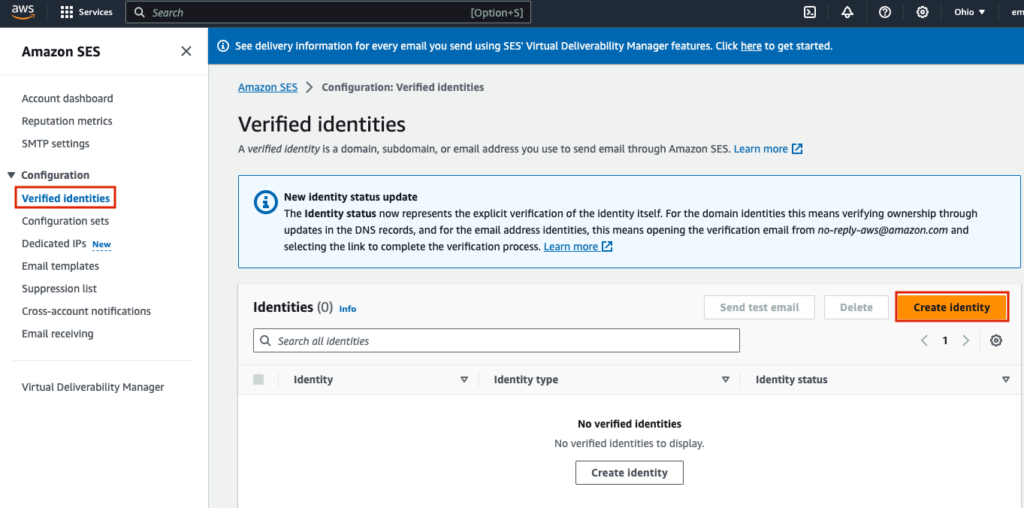
Now, navigate to ‘Verified identities’ on the left had side menu, and press ‘Create identity’.
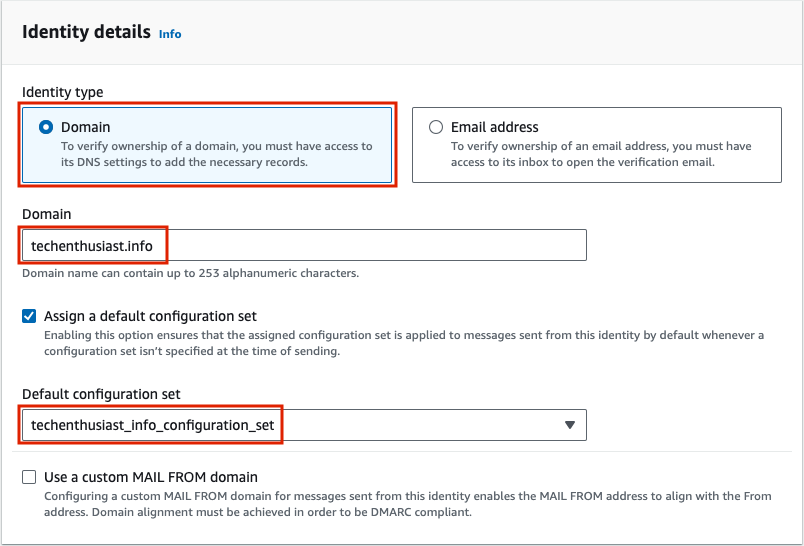
Under ‘Identity details’, select ‘Domain’, set domain. to <your domain>, and select ‘Assign a default configuration set’, selecting the configuration set you created in the last step.
Under ‘Verifying your domain’, ‘Advanced DKIM settings’, for Identity type select ‘Easy DKIM’, for DKIM signing key length select ‘RSA_2048_BIT’, and enable ‘Publish DNS records to Route53’ as well as ‘DKIM signatures’. Even if you aren’t using Route53, this could be useful in the future if you do switch to it.
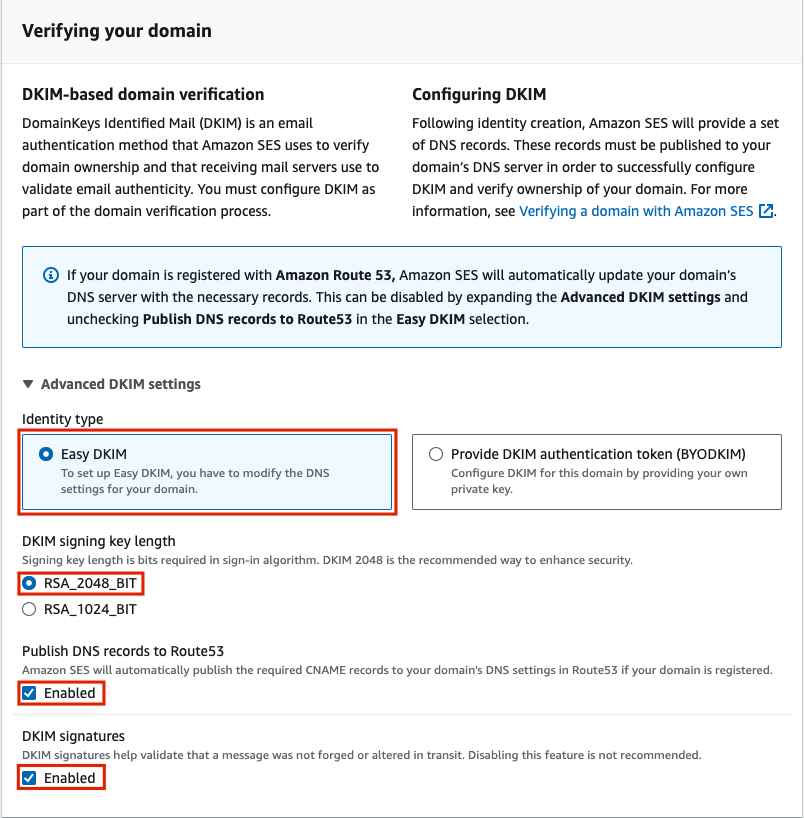
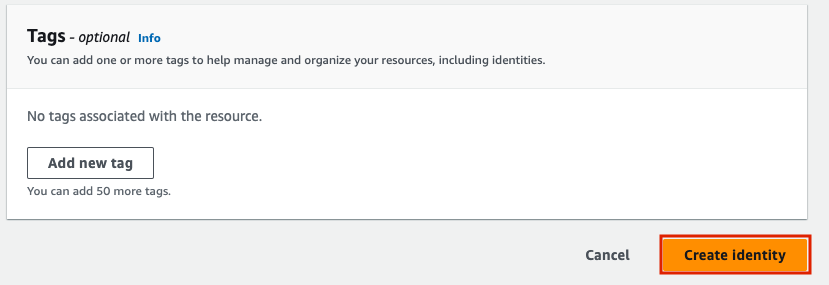
Finally, hit ‘Create identity’.
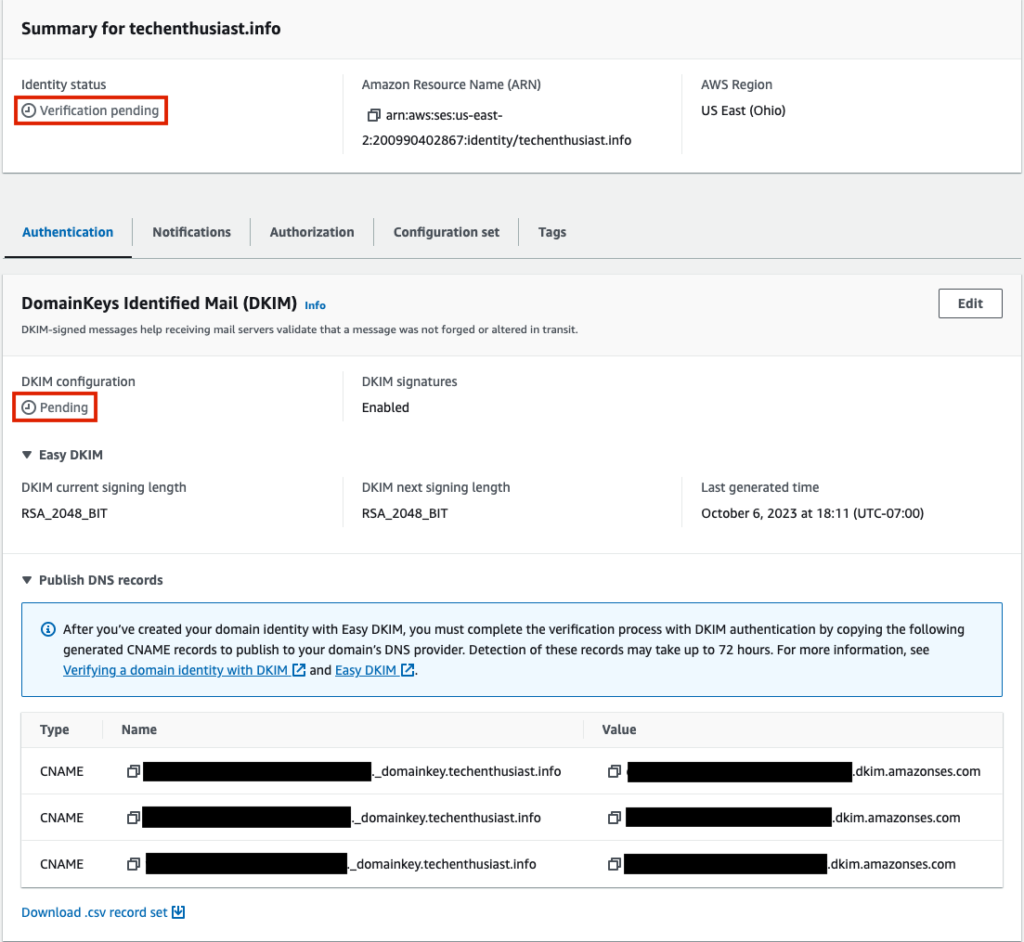
On the next page, you’ll notice that Identity status is ‘Verification pending’, and ‘DKIM configuration’ is also ‘Pending’. Under ‘Publish DNS records’ are three CNAME records to input into your DNS settings.
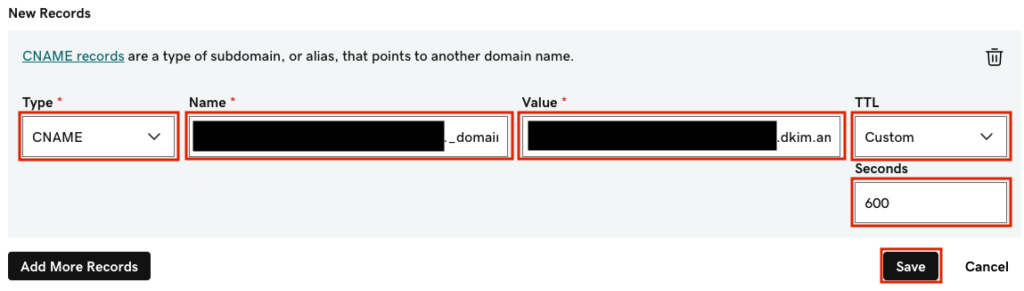
Create the three records in the DNS settings of your DNS provider. In the case of GoDaddy, be sure not to include <you domain> in the ‘Name’ attribute.
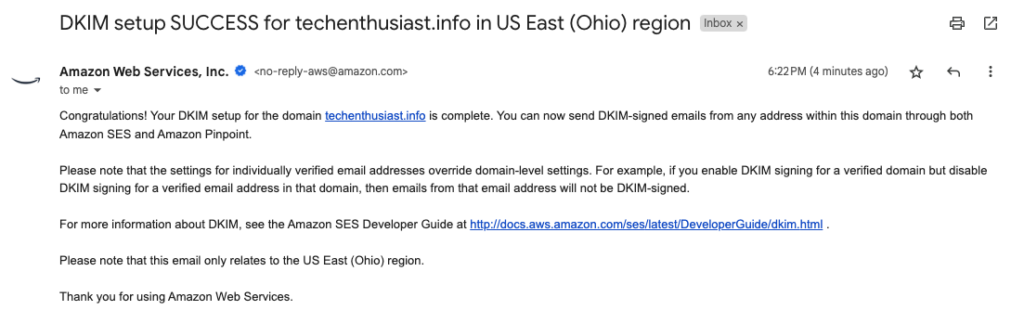
To check that the CNAME records saved and broadcasted to other DNS servers, you can check with the host command. In my case it only took a few minutes to receive an email from AWS alerting me that DKIM setup was a success.
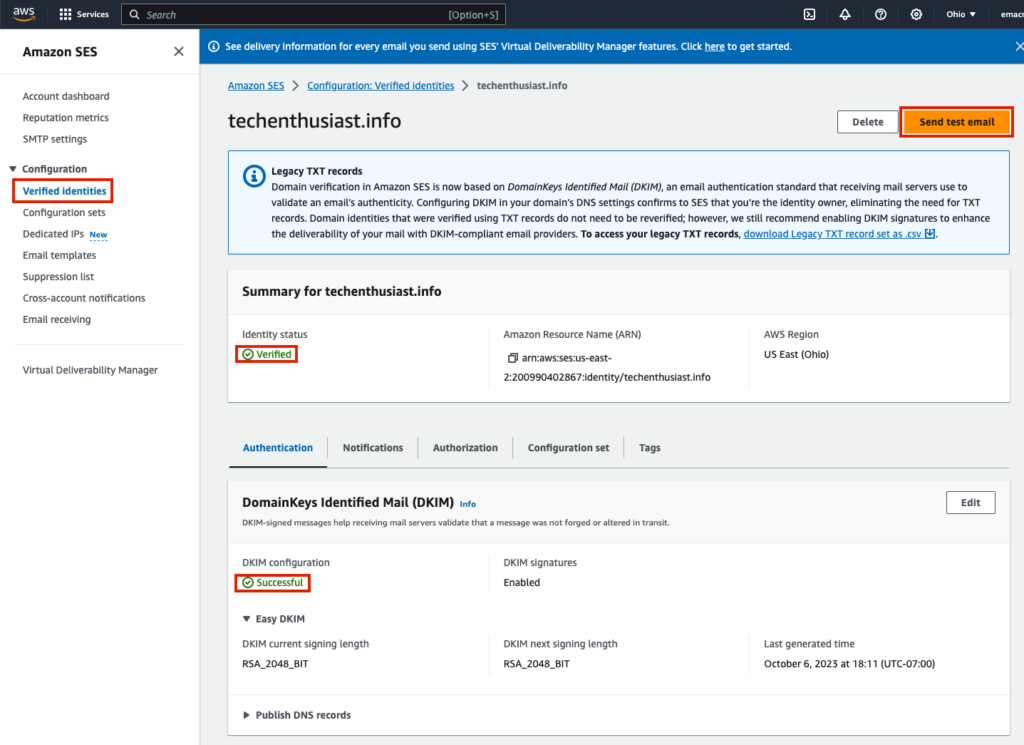
Going back to ‘Verified identities’ within AWS SES, I now see that my Identity status is ‘Verified’ and DKIM configuration is ‘Successful’. Now, click ‘Send test email’.
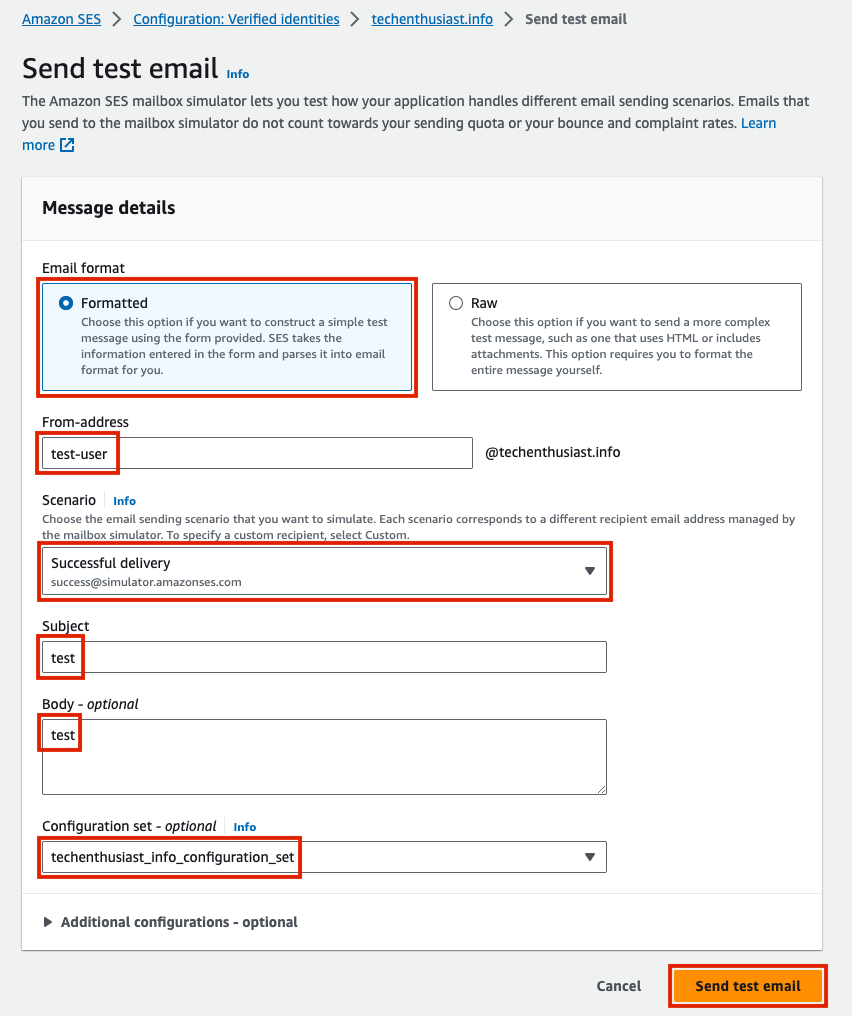
For ‘Email format’ choose ‘Formatted’, for ‘From-address’ choose any username, for ‘Scenario’ choose ‘Successful delivery’, for subject and body put ‘test’, input your configuration set, and press ‘Send test email’.
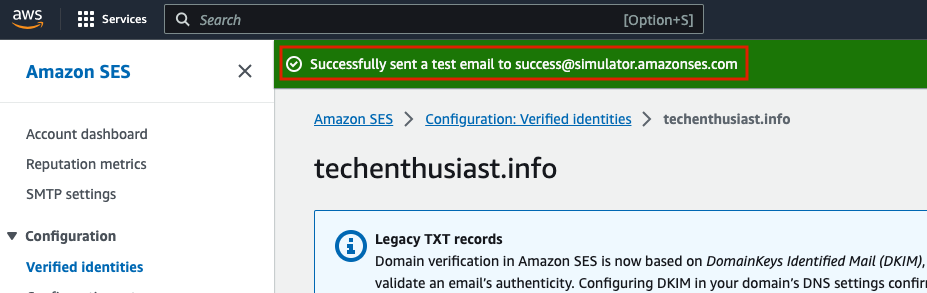
You will be redirected back to your verified identity, with a green success banner at the top of the screen. This confirms that AWS SES was able to send a test email from your domain.
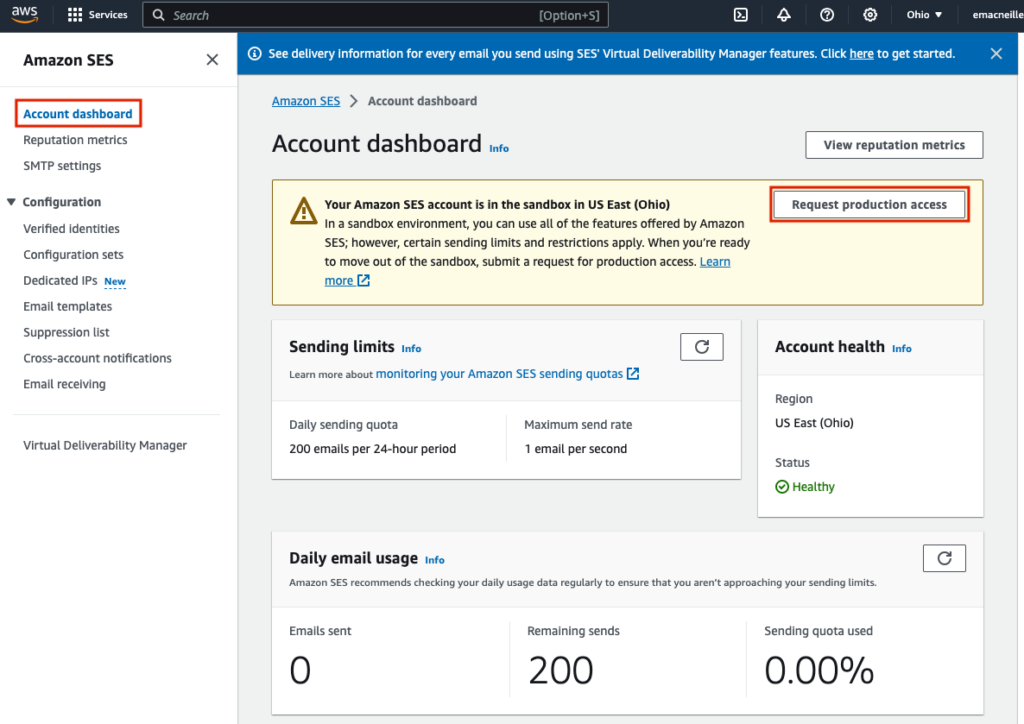
Request Production Access For Your AWS SES Account
As described here, your SES Account is initially in Sandbox mode, meaning, among other things, that you can only send email to verified identities. This of course won’t work if you are sending emails to other people because you can only verify emails and domains that you own. Navigate to you AWS SES Account Dashboard and select ‘Request production access’.
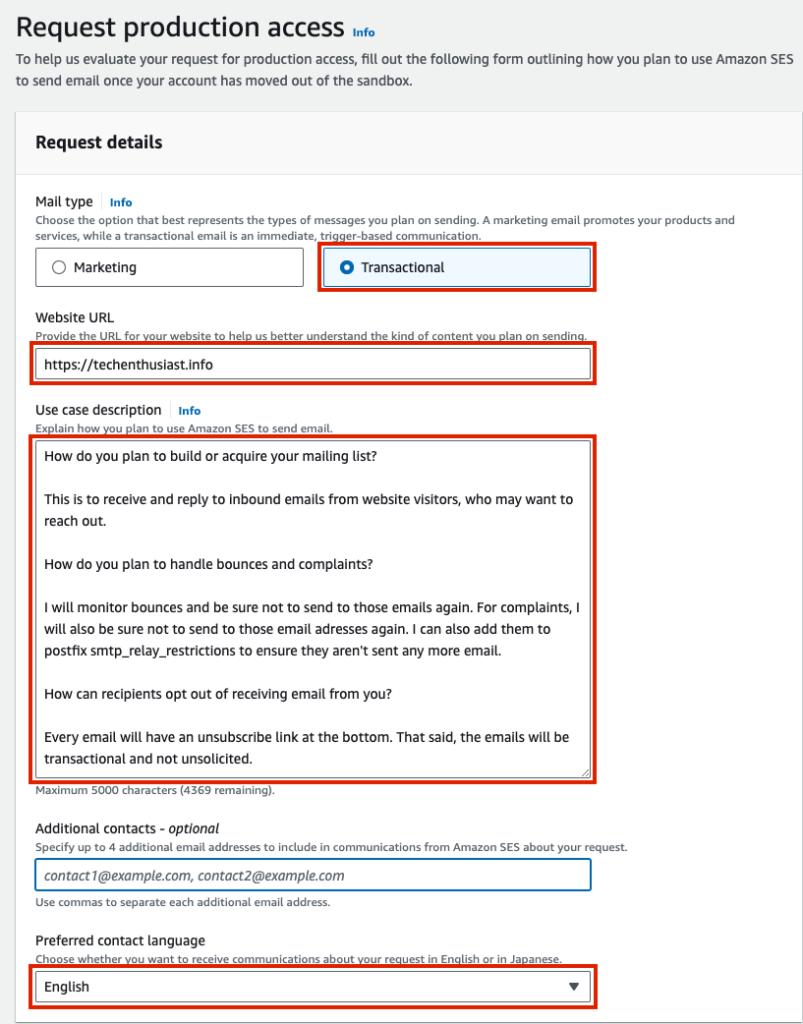
Under ‘Request details’, choose the most appropriate mail type for you, your website URL, Use Case description, any additional contacts to include, and your Preferred contact language. Within the use case description, they want three questions answered:
- How do you plan to build or acquire your mailing list?
- How do you plan to handle bounces and complaints?
- How can recipients opt out of receiving email from you?
Basically, they want to know if you are going to run spammy outbound marketing campaigns or not. I am planning on use this address just to listen for inbound emails and reply to them, so I communicated that in my response. A transaction, non marketing account is definitely going to have an easier time with the approval process, because it is lower risk to AWS to enable this type of activity.
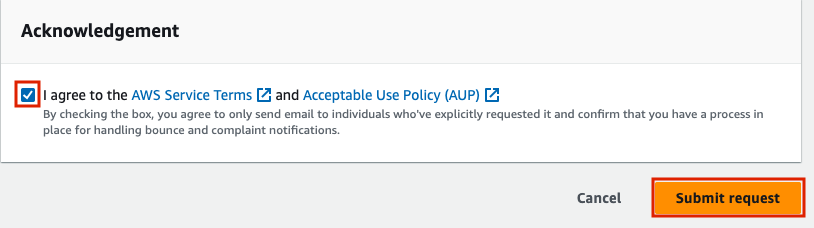
Agree to the AWS Service Terms and Acceptable Use Policy (AUP) and reading them thoroughly. Finally, click ‘Submit request’.
In the top of the page you will see a green success banner and a blue under review banner.

An Amazon Wen Services Support case is opened and you should receive 2 emails on the subject.

The emails will contain a link to the support case in AWS, where you can reply to the latest inquiry.
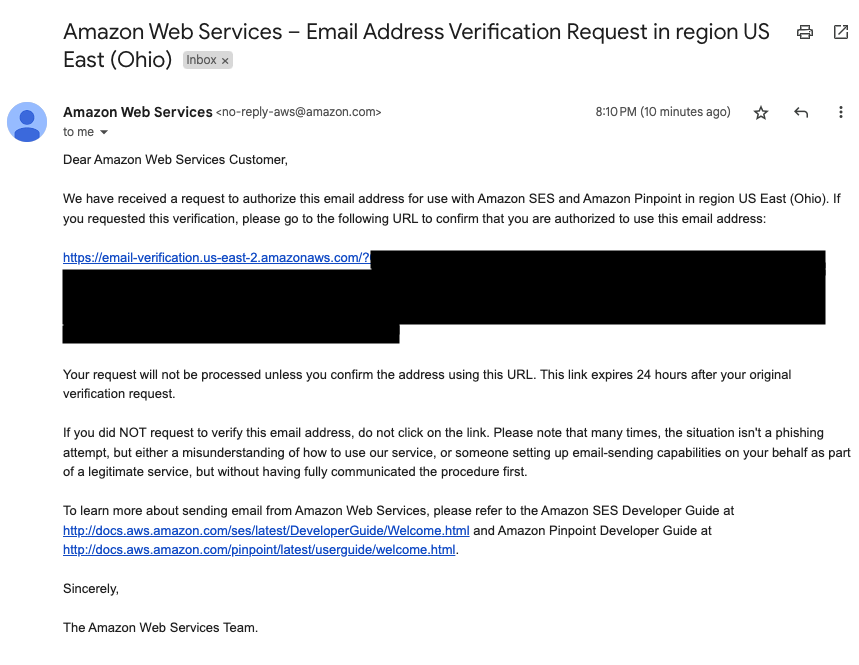
You won’t be able to send to any external emails until your account is approved to move to production. If you are still waiting on this, verify your personal email and test email accounts. Under ‘Verified Identities’, create a new identity, and instead of ‘Identity type of ‘Domain’, choose ‘Email address’.

You will receive an email with a link, and once you click it, that email will be verified, meaning it can be sent email via AWS SES even when your account has not yet moved out of production.
I made the initial request on 2023-10-07, and received the confirmation email that I was moved out of sandbox on 2023-10-16.
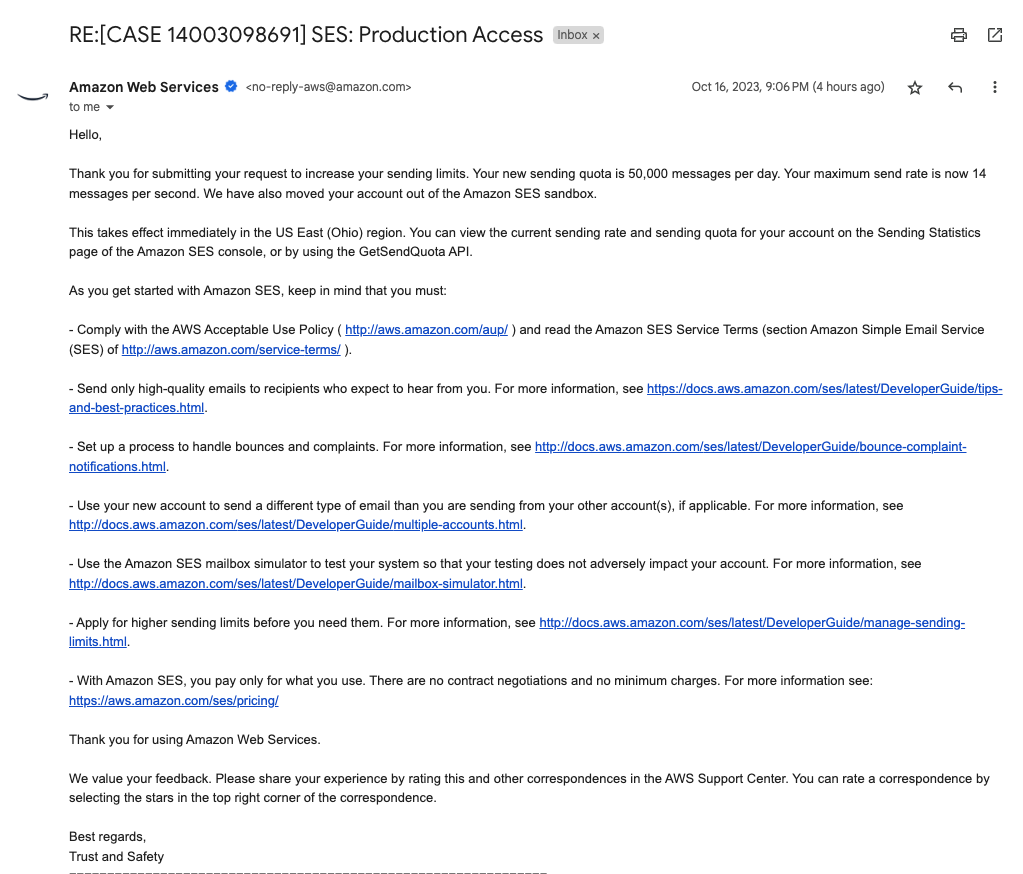
Here are some links they included in the email:
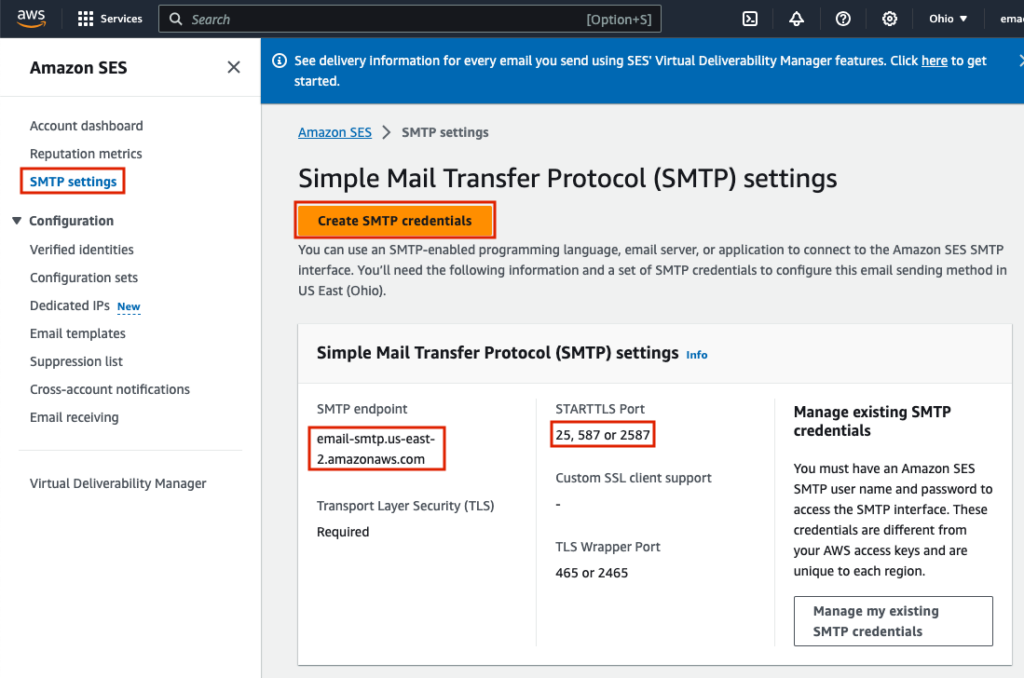
Set Up AWS SMTP Credentials
Log in to your AWS Account and navigate to SES SMTP Settings, here for us-east-2. Note the SMTP endpoint, and STARTTLS ports, and copy them to a separate text editor. These will be needed later on in our postfix configuration. Click ‘Create SMTP credentials’.
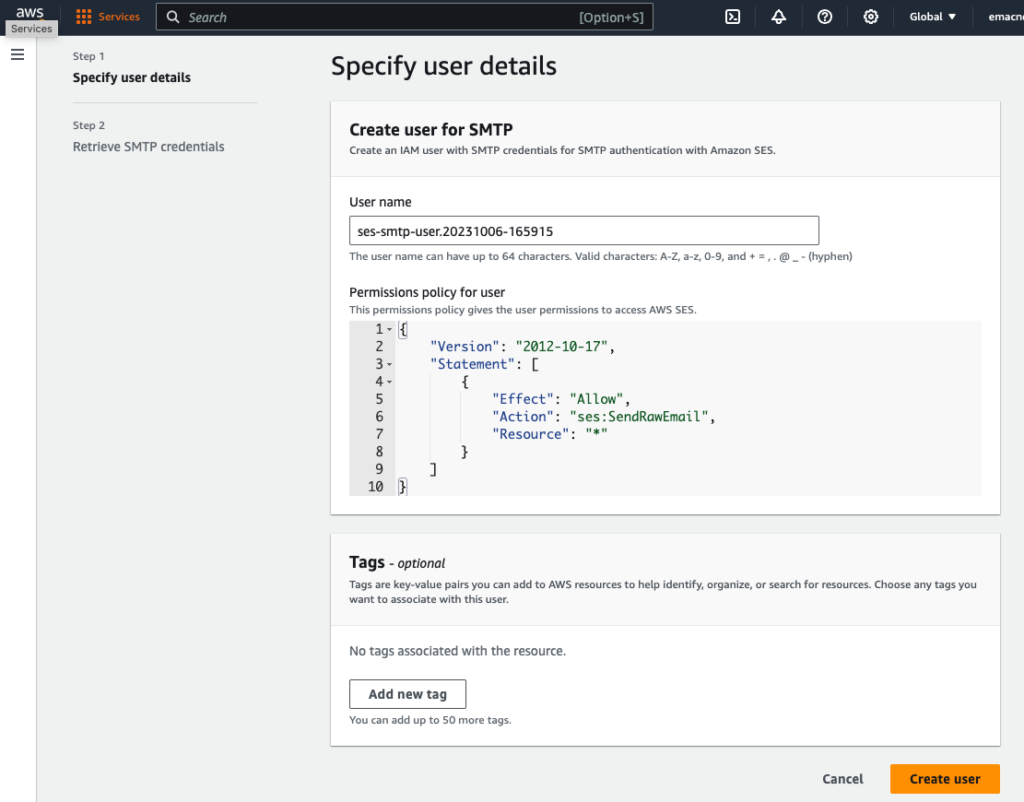
Optionally change the user name and click ‘Create user’.
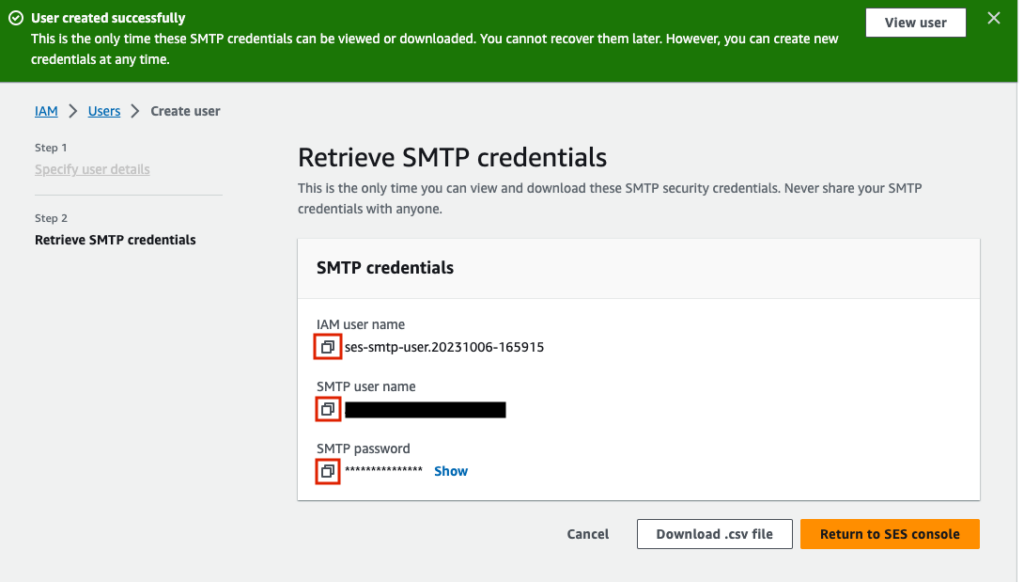
Now there will be a green success banner at the top of the screen, and you will be shown your IAM user name, SMTP user name, and SMTP password. Copy these into a separate text editor. We will enter these into our postfix configuration to authorize mail we are sending through the AWS SMTP relay.
Configure SMTP Relay For Sending Email
note that we previously installed ‘libsasl2-modules‘ which is required for this step. Create a new file ‘/etc/postfix/sasl_passwd’ and fill it with ‘<SMTP endpoint> <SMTP user name>:<SMTP password>’, using the ‘SMTP endpoint’, ‘SMTP user name’, and ‘SMTP password’ you got from the previous step.
sudo nano /etc/postfix/sasl_passwd

Press ‘Ctrl + o, Enter, Ctrl + x’ to save and exit nano. Now, postmap /etc/postfix/sasl_passwd, and set permissions so that most users cannot read the file, given it contains a sensitive password.
sudo postmap /etc/postfix/sasl_passwd
sudo chmod 0600 /etc/postfix/sasl_passwd /etc/postfix/sasl_passwd.db
Now, we need to update some configuration within ‘/etc/postfix/main.cf’.
sudo nano /etc/postfix/main.cf
- relayhost = <your SMTP relay host>:<your SMTP relay port>
- smtp_sasl_auth_enable = yes
- smtp_sasl_security_options = noanonymous
- smtp_sasl_password_maps = hash:/etc/postfix/sasl_passwd
- smtp_use_tls = yes
smtp_tls_CAfile = /etc/ssl/certs/ca-certificates.crt
Note for AWS, port 25 is throttled by default, so I am using port 587 instead. Here is what it looks like for me.
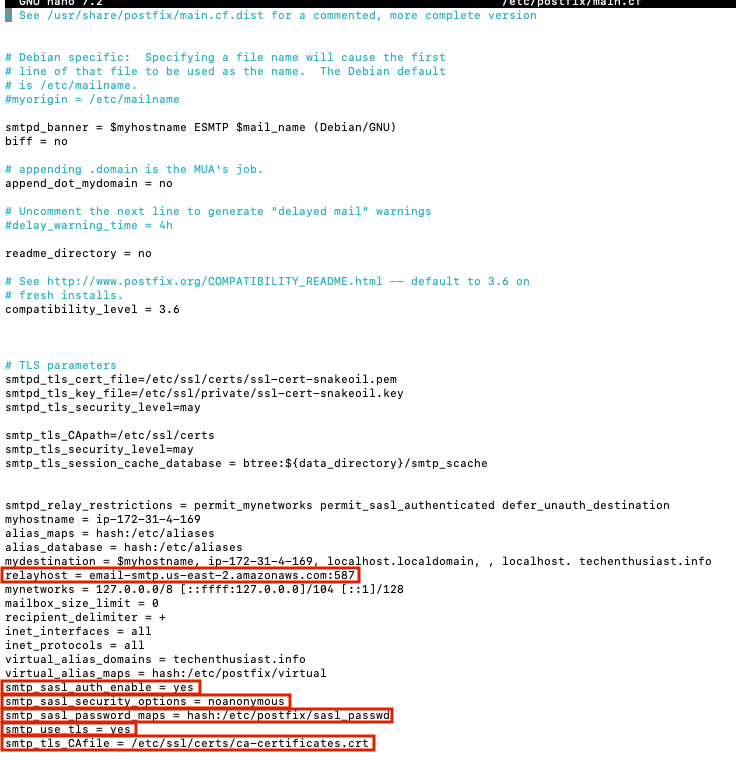
Press ‘Ctrl + o, Enter, Ctrl + x’ to save and exit nano. Finally, reload postfix.
sudo systemctl reload postfix
Now, we can test sending to an external email address using telnet. Be sure that the ‘mail from:’ field is a verified identity within your SMTP provider, or the email may be rejected.
telnet localhost 25
ehlo localhost
mail from: elliot@techenthusiast.info
rcpt to: elliotmacneille@gmail.com
data
Subject: Test Subject
test
.
quit
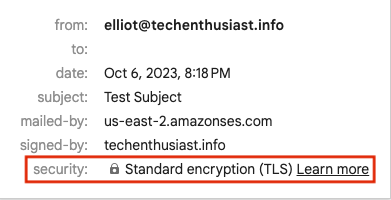
Instantly I see that I received an email.

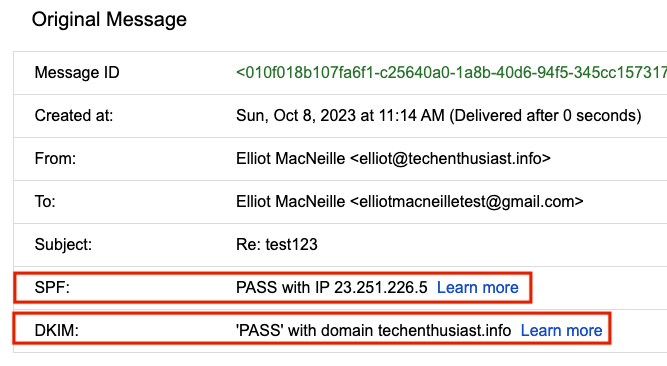
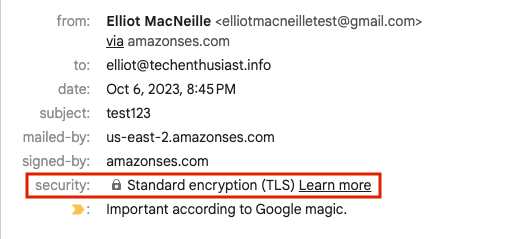
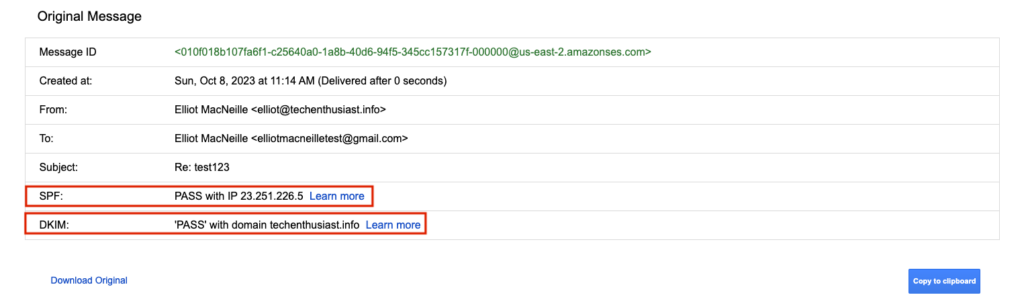
Here is a zoom in on the sender information. Note that TLS encryption was used successfully between AWS and Gmail, or else we would see a red, broken lock under ‘security’.
I can also click on the kebab menu on the left hand side and select ‘Show Original’ to see all the email headers.

Importantly, SPF and DKIM both pass.
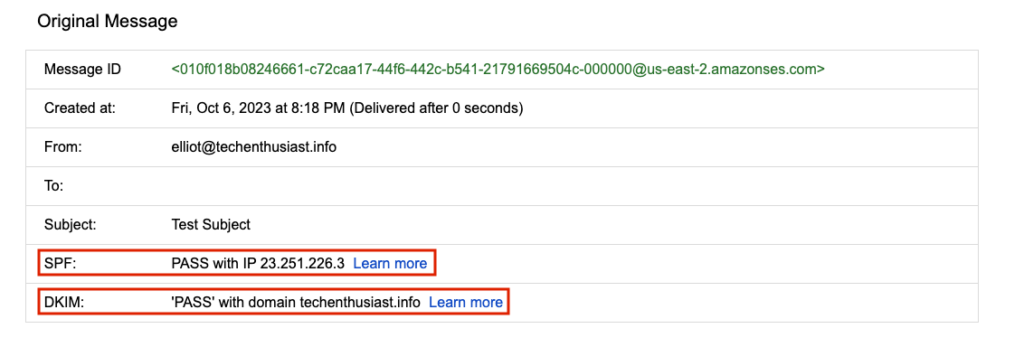
With all the security settings in good standing, we can feel assured that we are set up for good email deliverability.
Forward Email To Your Personal Gmail
Now that we can receive email for our email domain, it would be useful for this mail to be forwarded on to a personal gmail account. First, you can update ‘/etc/postfix/’ virtual to map to your personal gmail.
sudo nano /etc/postfix/virtual
change ‘admin’ to ‘<your personal gmail>’

Press ‘Ctrl + o, Enter, Ctrl + x’ to save and exit nano. and then, run
sudo postmap /etc/postfix/virtual
sudo systemctl reload postfix
Send another email from your test gmail account to <username>@<my domain>. You should see something like this in the syslog
sudo tail /var/log/syslog -n 100
2023-10-07T03:45:29.723183+00:00 ip-172-31-4-169 postfix/smtp[22084]: 567F9202C7: to=<elliotmacneille@gmail.com>, orig_to=<elliot@techenthusiast.info>, relay=email-smtp.us-east-2.amazonaws.com[3.15.106.14]:587, delay=0.37, delays=0.01/0.05/0.13/0.19, dsn=2.0.0, status=sent (250 Ok 010f018b083d7dd5-21cf8bea-e9fd-4953-935c-95e434bdb702-000000)
And, the message should appear in your gmail account, but this time, from your other gmail account, and to your business email domain. Here is the email in my inbox.
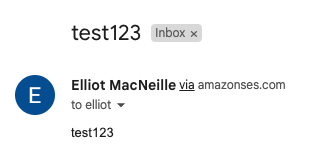
Here is a close up on the sender information. We can see TLS was used. Google Magic has even marked this email as important.
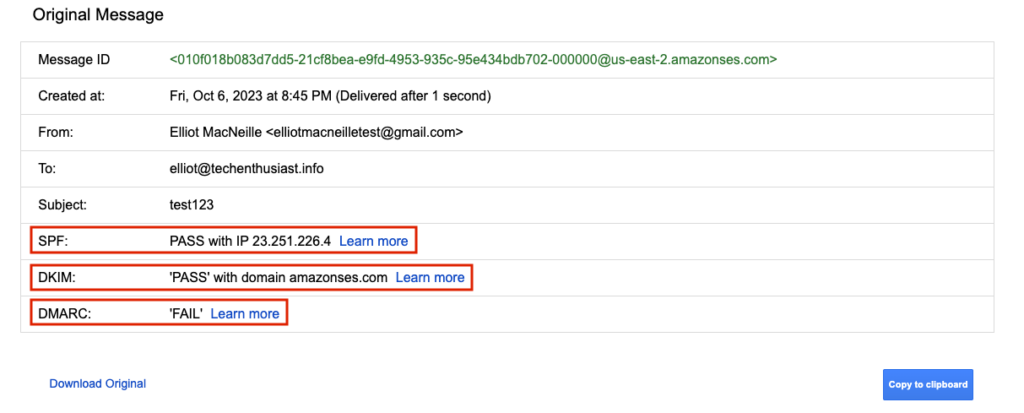
Here is what we see at the top of ‘Show Original’. SPF and DKIM have both passed. DMARC has failed, which should be investigated, but keep in mind, this is just the email forwarded from postfix. It isn’t something that the sending will be aware of.
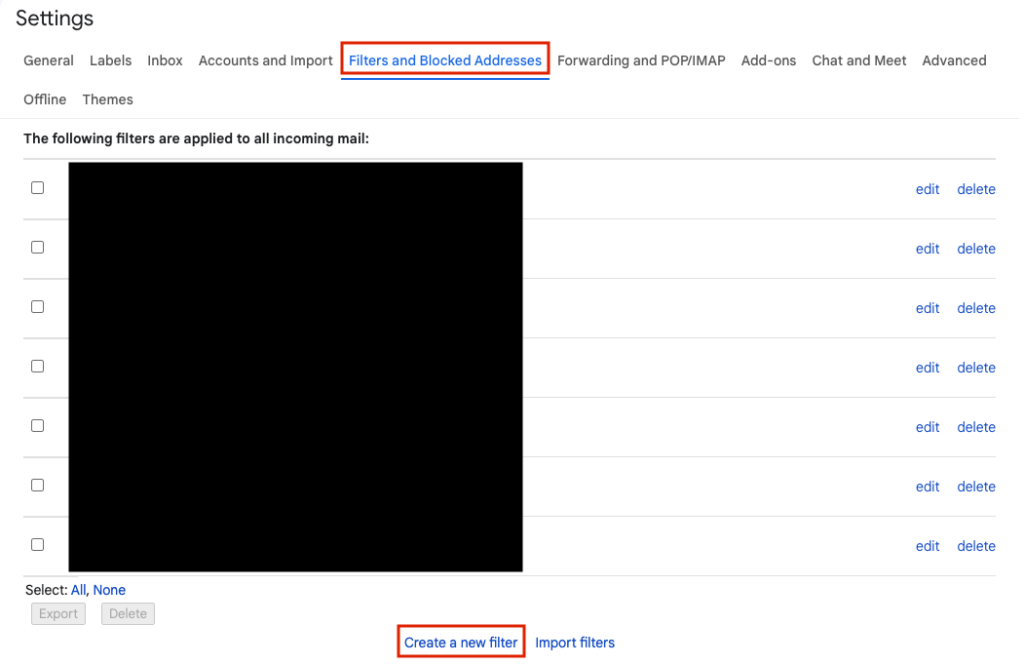
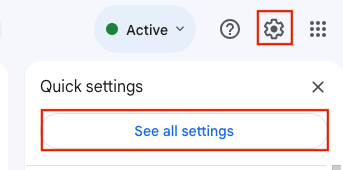
Note that when postfix forwards an email, it won’t appear in ‘/var/mail/admin’ nor ‘/home/admin/mbox’. Only through the syslog can we see a record of the transaction. Now, let’s set up a filter and label in gmail so that emails to this business domain can be managed from a single place. In the upper right of gmail, click on the gear and then ‘See all settings’.

Within settings click on ‘Filters and Blocked Addresses’ and then ‘Create a new filter’.
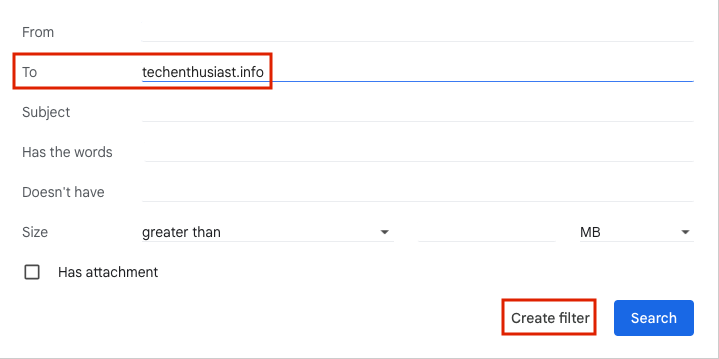
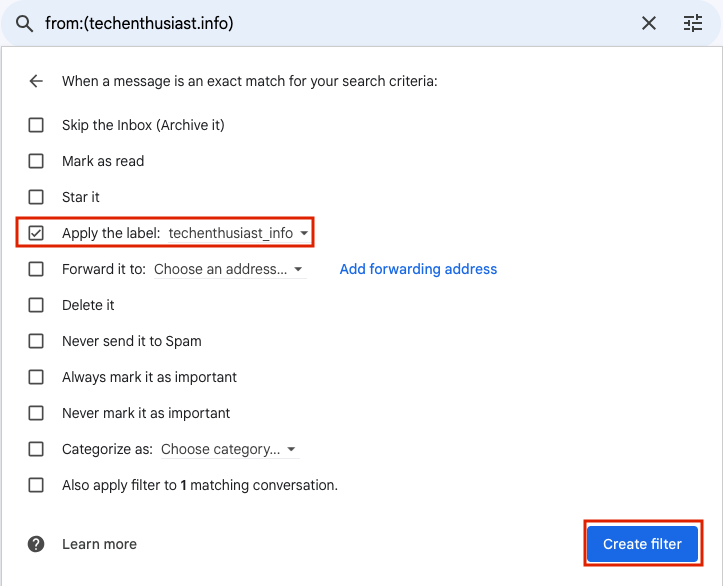
Under ‘To’ put ‘<my domain>’ and then click ‘Create filter’.
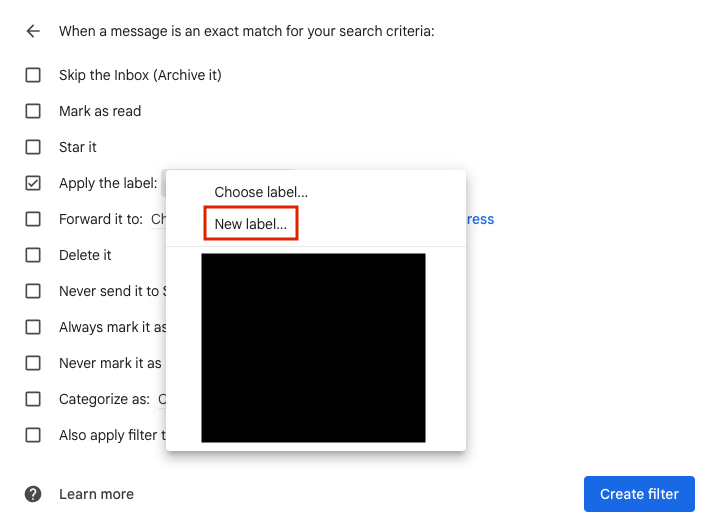
For ‘Apply to the label:’, choose ‘New label…’.
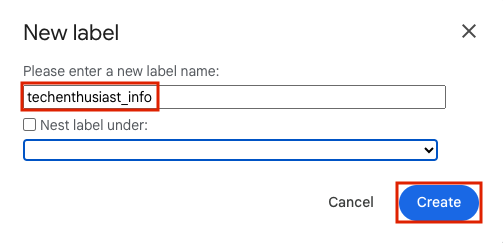
Give the label a meaningful name and click ‘Create’.
Finally click ‘Create filter’.
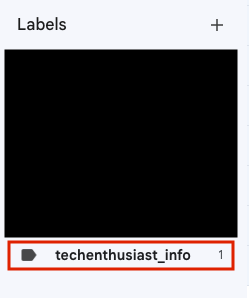
Next time your business address receives an email, it will be in your main inbox, but it will also be in a folder with all the other emails to that email domain.
Enable Inbound SASL In Postfix With Dovecot
Now that you are receiving email sent to your business domain email addresses in gmail, it would be nice to be able to reply right in gmail, but from your business email. Fortunately this can be done. First, we are going to need to configure dovecot to respond to SASL authentication requests from google. We will be following the documentation here and here. Recall we already installed dovecot in the first step (sudo apt-get install -y dovecot-imapd dovecot-pop3d).
sudo nano conf.d/10-master.conf
Scroll down to ‘service auth {‘ and uncomment the three lines below ‘# Postfix smtp-auth’ by deleting the ‘#’ character.
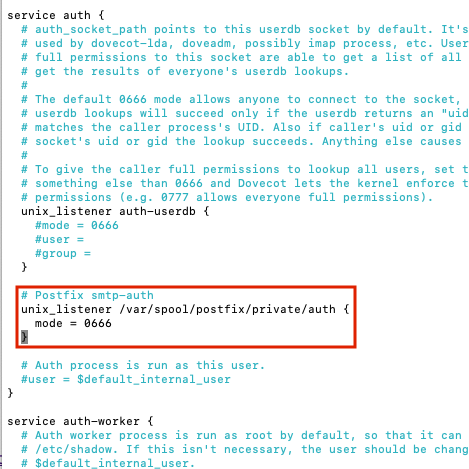
Press ‘Ctrl + o, Enter, Ctrl + x’ to save and exit nano. Now we need to add a few parameters to ‘/etc/postfix/main.cf’.
sudo nano /etc/postfix/main.cf
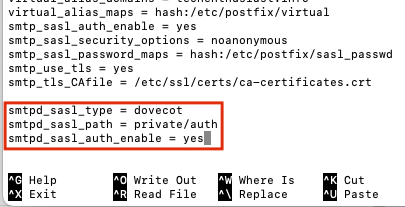
Add the following lines:
- smtpd_sasl_type = dovecot
- smtpd_sasl_path = private/auth
- smtpd_sasl_auth_enable = yes
Press ‘Ctrl + o, Enter, Ctrl + x’ to save and exit nano. Now, external SMTP servers should be able to use our linux user’s username and password to verify auth when forwarding mail through our SMTP server. We can verify that auth is being offered by Postifx by seeing that ‘250-AUTH PLAIN‘ is present in the telnet ehlo preamble.
telnet localhost 25
ehlo localhost
quit
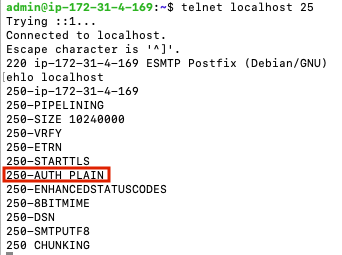
Note that ‘250-AUTH PLAIN‘ is present.
Enable TLS in Postfix
Setting up TLS verification for inbound mail to Postfix allows your server to receive email encrypted and without fear of a man in the middle. Postfix will need access to the private key and public certificate for your ‘mail’ subdomain. If you have multiple domains, they will all need to be in the same certificate, because Postfix does not support loading more than one certificate (SNI).
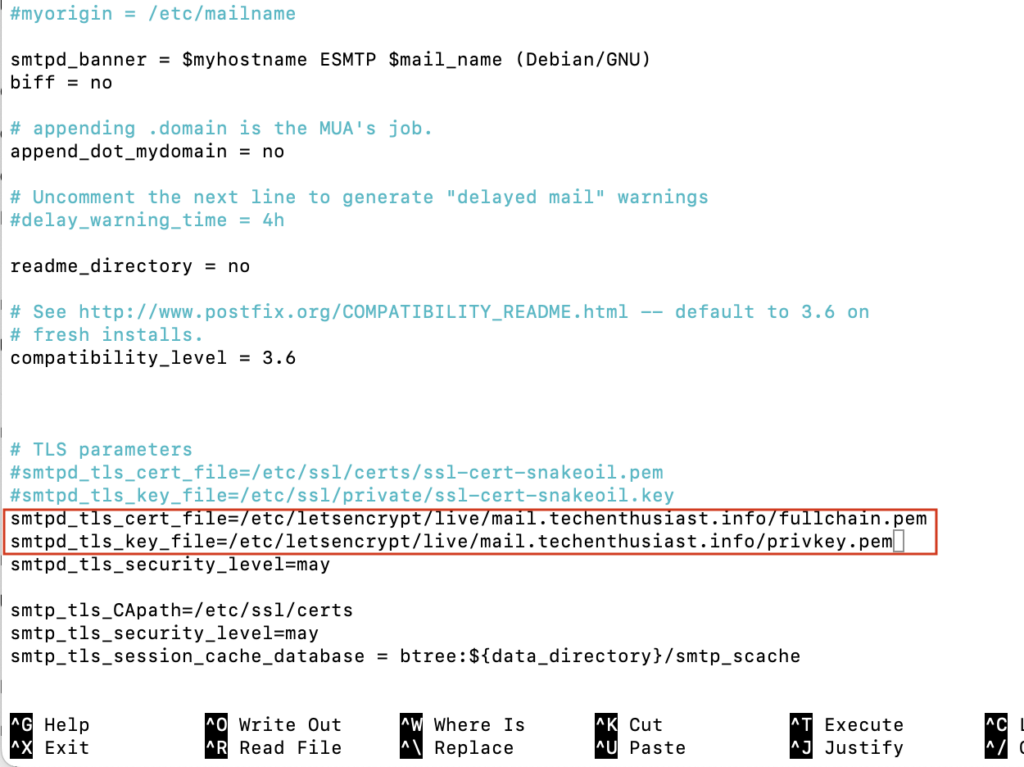
sudo nano /etc/postfix/main.cf
Comment out the lines for ‘smtp_tls_cert_file’ and ‘smtp_tls_key_file’ and create new ones, with the path to your mail subdomain TLS certificate and key. If you used certbot these will be something close to ‘/etc/letsencrypt/live/mail.techenthusiast.info/fullchain.pem’ and ‘/etc/letsencrypt/live/mail.techenthusiast.info/privkey.pem’.
Press ‘Ctrl + o, Enter, Ctrl + x’ to save and exit nano. Now reload Postfix.
sudo systemctl reload postfix
When we connect to postfix from Google in the next step, we will create a TLS connection and verify this step is working correctly.
Enable Gmail To Send As Your Business Email
If you haven’t set a password for your linux user or you don’t know it, set it now.
sudo passwd admin
Enter in a strong password twice.

In Gmail, in the upper right hand side, click the gear, and then ‘See all settings’.
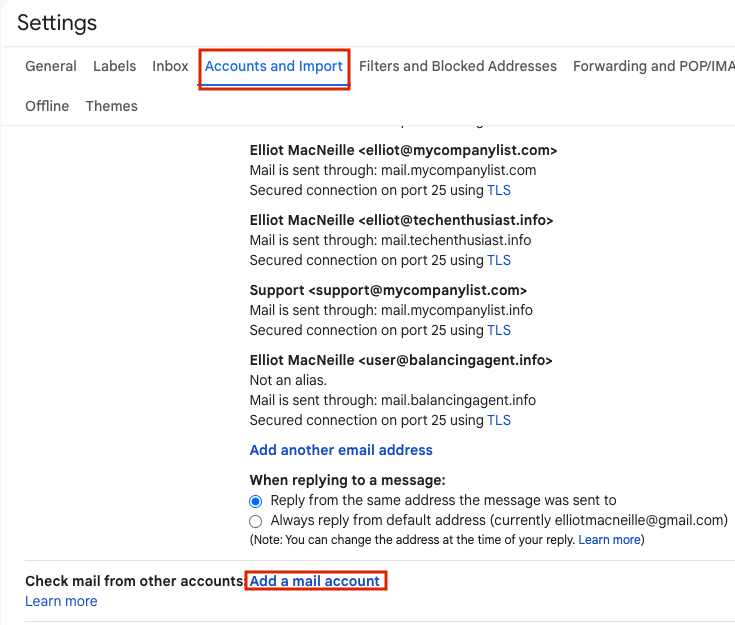
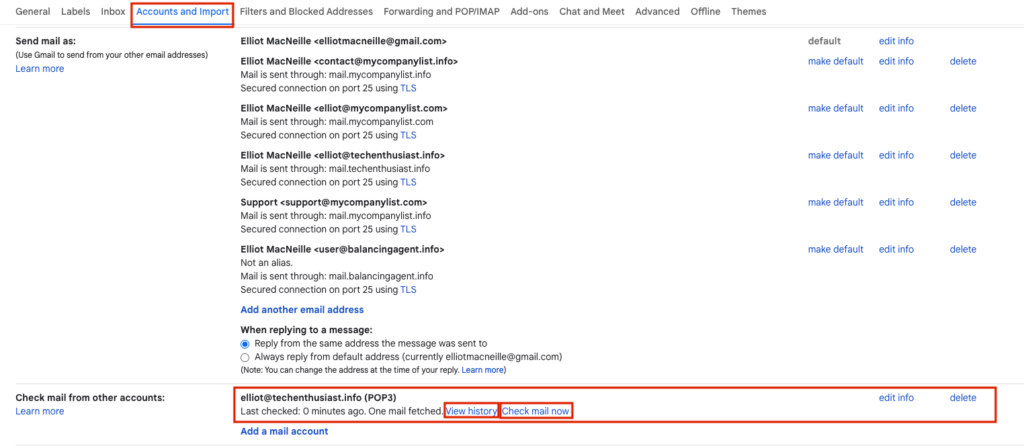
Navigate to ‘Accounts and Imports’ and under ‘Send mail as’, click ‘Add another email address’. I also recommend under ‘When replying to a message’, selecting ‘Reply from the same address the message was sent to’.
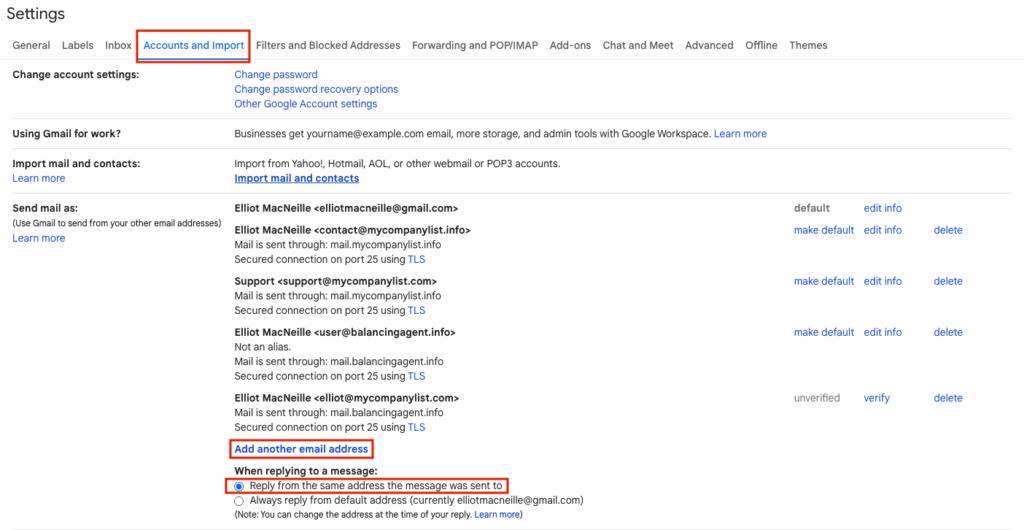
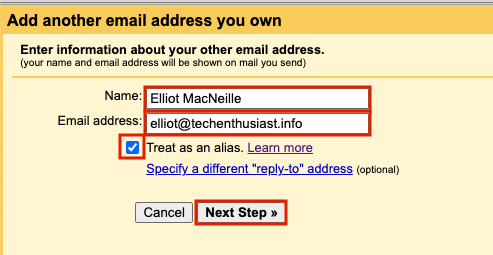
A yellow popup should appear. If you want the email to have a different name displayed to people you send email to, change the value of ‘Name’. Type in the email address you would like to create, in my case it is ‘elliot@techenthusiast.info’. I have selected ‘Treat as an alias’ because I want to have these emails appear in the same gmail account for convenience. Finally, click ‘Next Step’.
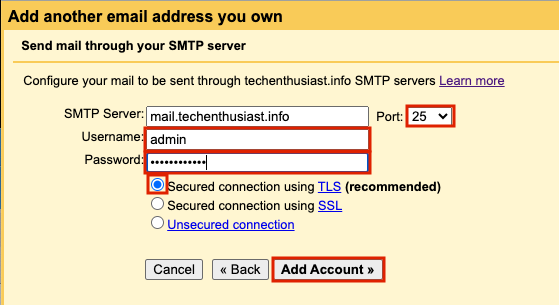
On the next page, check that the value for SMTP Server is ‘mail.<your domain>’. Set Port to ’25’, Username to ‘admin’ (or your linux user’s name), and enter the same password you set in the previous step. Finally, press ‘Add Account’.
On the final page, you should be notified that an email confirmation has been sent to the email you are trying to send mail as.
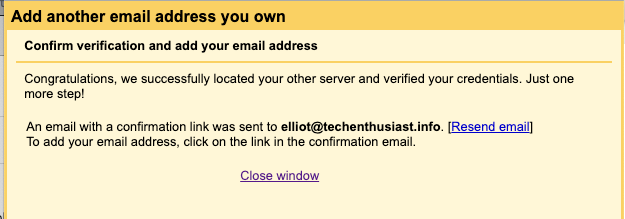
This email should automatically come into your inbox, if you have already moved your AWS SES account to production. If not, you can temporarily change your virtual alias mapping to forward @<your domain> to your local linux user instead.
sudo nano /etc/postfix/main.cf
Press ‘Ctrl + o, Enter, Ctrl + x’ to save and exit nano. Now postmap the virtual file and reload postfix.
sudo postmap /etc/postfix/virtual
sudo systemctl reload postfix
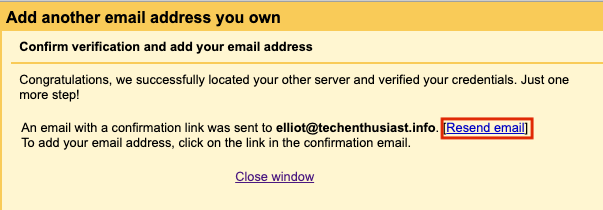
Trigger the verification email to resend. Or if you have already closed this window, delete the ‘Send mail as’ email address and recreate it.
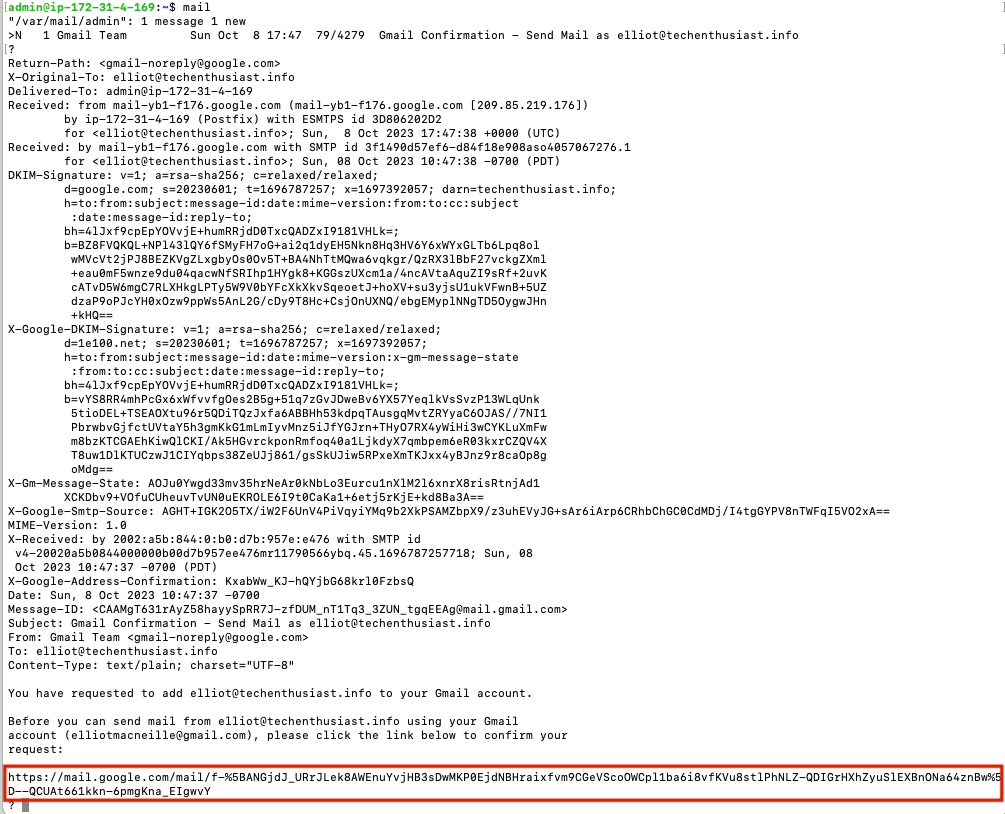
In the linux server, check your mailbox.
mail

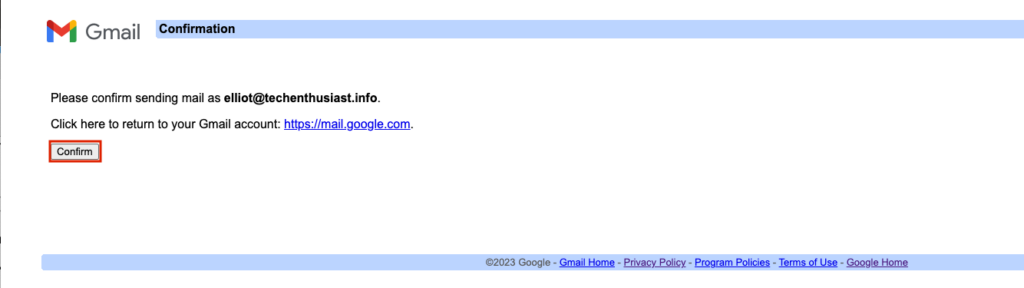
Looks like the expected email was received. Press ‘Enter’ to open the mail. Copy the link at the bottom of the email and open it in your browser.
Finally, quit out of the mail client on the linux server.
quit
In the browser window, press ‘Confirm’ to continue.
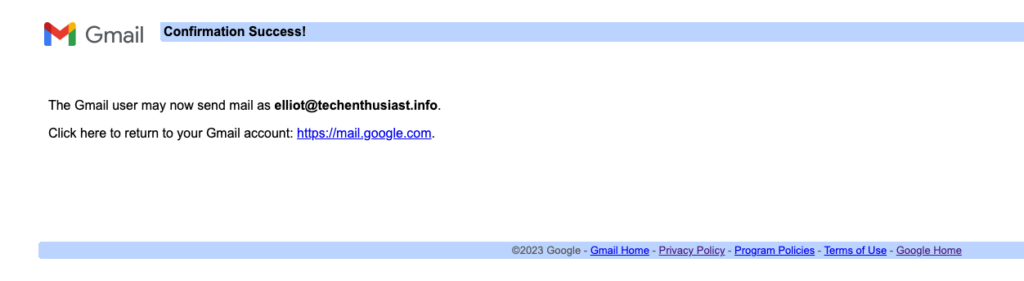
Finally, you will see a page confirming that the email address is confirmed.
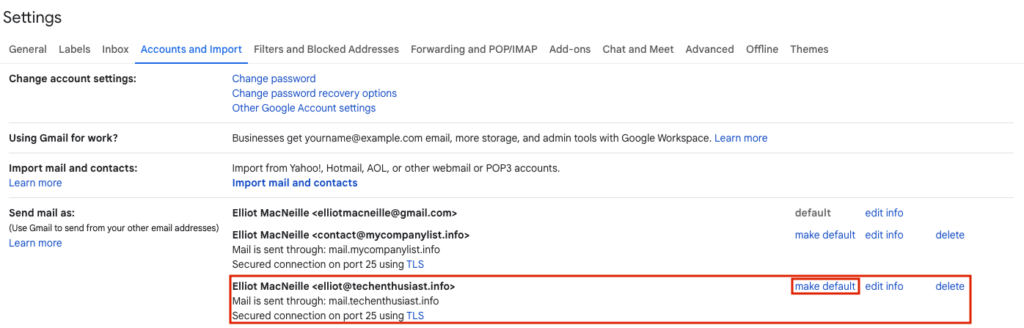
Back in Gmail -> Upper right Gear -> ‘See all settings’ -> ‘Account and Import’ -> ‘Send mail as:’ you will see the email you added, and under the ‘default’ column, it will say ‘make default’ instead of ‘unverified’.
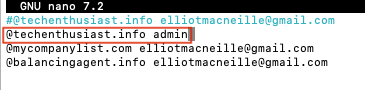
Finally, revert the changes we made to ‘/etc/postfix/virtual’ by uncommenting the normal forwarding and commenting out the forwarding to the local linux user.
sudo nano /etc/postfix/main.cf

Press ‘Ctrl + o, Enter, Ctrl + x’ to save and exit nano. Now postmap the virtual file and reload postfix.
sudo postmap /etc/postfix/virtual
sudo systemctl reload postfix
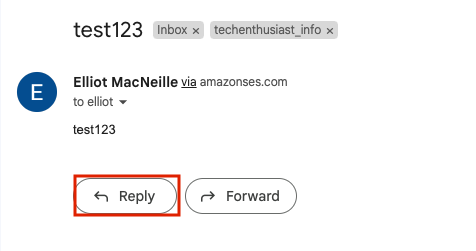
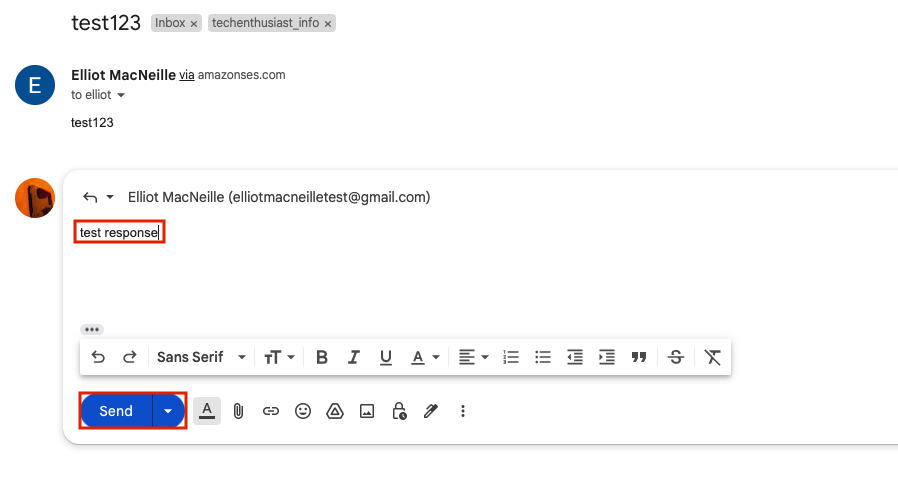
Now, in your personal email, open up one of the test messages you received earlier from your test email account and hit ‘Reply’. You should be able to reply as your business email.
You have the ability to choose you business email as the ‘From’ value.
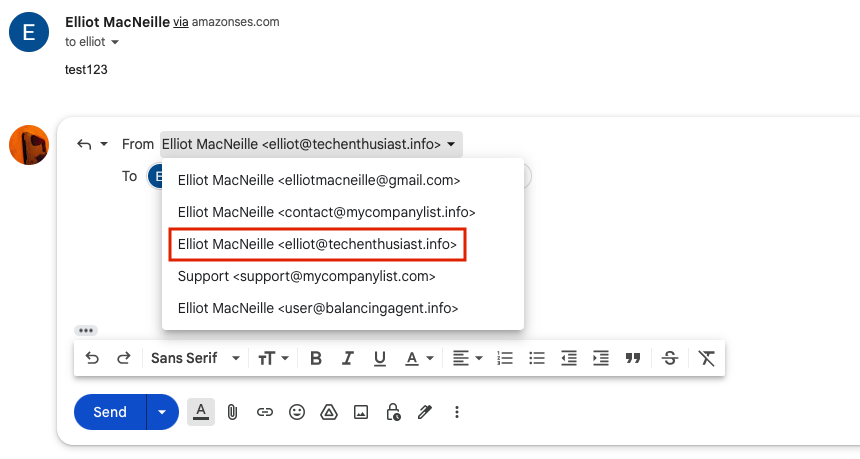
Give the email a short body and hit ‘Send’.
In your personal email, you should see the email come in.
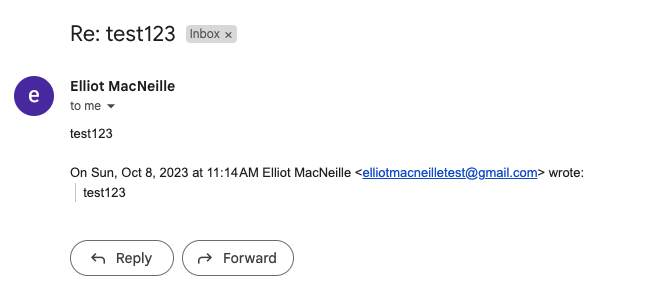
Note that while the previous email bodies are at the bottom of the email, the incoming email was not grouped with the initial email sent like replies usually are. It could be that this process doesn’t conserve certain fields like a thread Id that are usually conserved when emailing a normal email client. Here is a zoom in on the sender information.
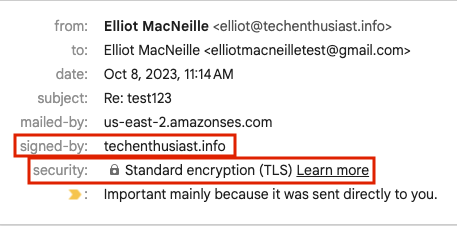
Note that the email was signed by <your domain>: and that TLS was used. Finally, Click on the kebab three dots in the upper right -> ‘Show Original’.
We can see that SPF and DKIM both passed. Everything is looking good in terms of email security and deliverability.
Enable Additional Domains
Extra domains can be added easily. You just need to add them in 5 places:
- setup new domain’s DNS settings
- include ‘mail’ subdomain in TLS certificate
- main.cf values for ‘virtual_alias_domains’
- /etc/postfix/virtual
- Gmail filter assigning to a label
- Gmail ‘Mail from’ alias
Here is a look at my DNS settings for the new domain.


Here you can see multiple domains in a TLS certificate. Here is a look at the TLS certificate I will be using to handle three domains. Note certbot allows a comma separated list of domains for the ‘-d’ parameter when generating or renewing a certificate.
sudo cat /etc/letsencrypt/live/aws.techenthusiast.info/fullchain.pem | openssl x509 -inform pem -text| grep DNS

Here is a look at my /etc/postfix/main.cf with three domains for ‘virtual_alias_domains’.
sudo cat /etc/postfix/main.cf

Here is a look at my /etc/postfix/virtual to forward multiple domains to my personal Gmail. As always, be sure to postmap and reload postfix after editing this file.
sudo cat /etc/postfix/virtual

Here is a look at my gmail filter for the new domain.

Finally, here is the verified email alias for the new domain.

Monitor AWS SES Reputation Metrics
If you enabled reputation metrics in your AWS SES configuration set, you can monitor your remaining email quota as well as reputation metrics ‘Bounce rate’ and ‘Complaint rate’ within your AWS Account within ‘Amazon SES’ -> ‘Reputation metrics’ (here for us-east-2).
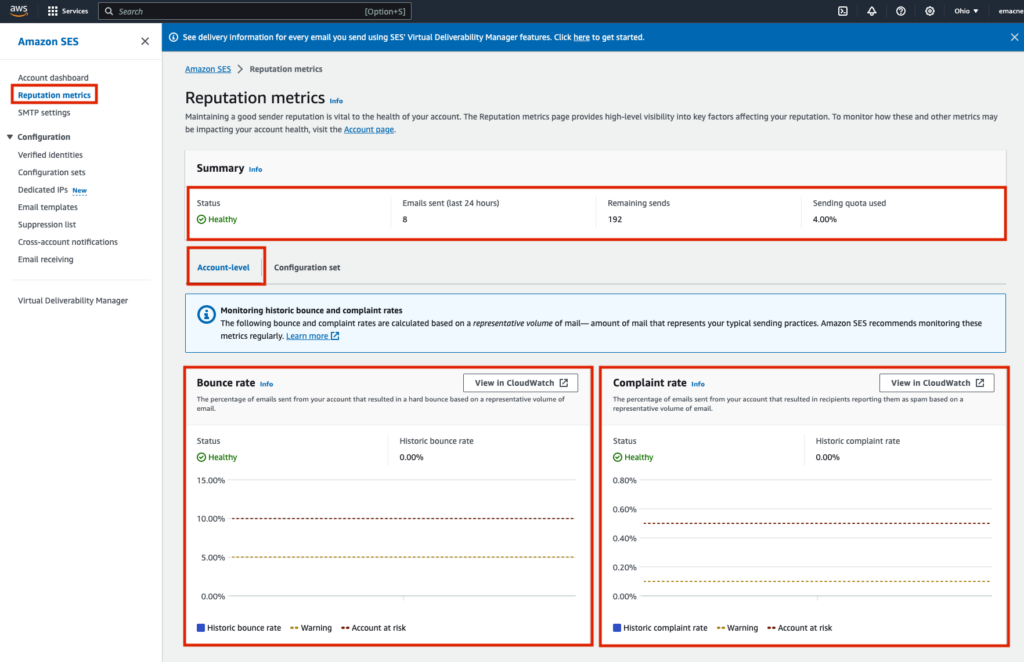
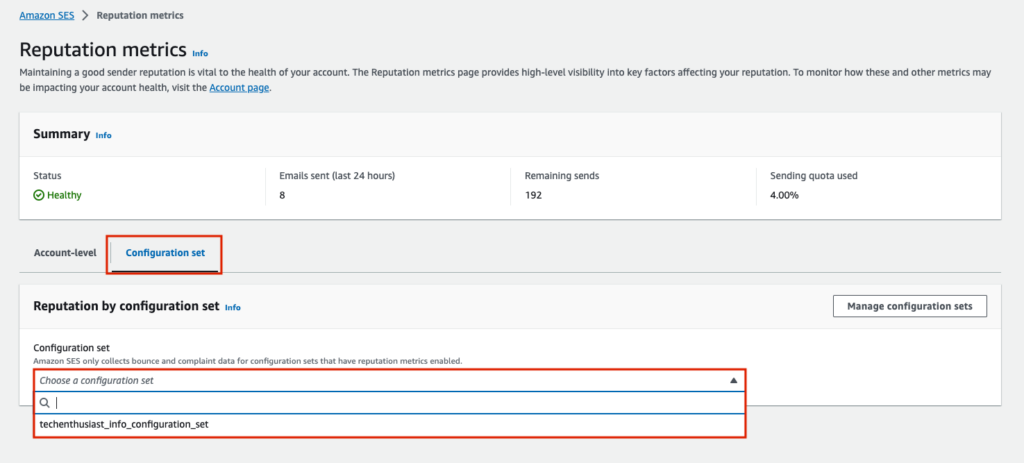
You can also group metrics by configuration set, so it can be useful to have multiple configuration sets soley for the purpose of grouping Reputation metrics separately for separate email domains or email campaigns within a domain.
Fallback MX Records
We can have multiple MX records at different priorities, from 0 to 100, with 0 being the highest. If a sending server is unable to reach the highest priority MX record, it will retry with the next highest priority record. Here are some reasons the sending server may not be able to reach your Postfix server:
- Your server is down
- You firewall is not allowing inbound traffic on email ports (ex: 25)
- You Postfix process is not running
- Your Postfix listening ports and firewall ports are misaligned
- Network congestion of a faulty network connection is preventing a connection
If your Postfix server is up, but it doesn’t accept the inbound email due to configuration, this will be considered a legitimate response, and sending will not be retried with other MX records. So, it is important to check Postfix logs and see if inbound email for a configuration reason. Here is a look at my MX records, with a priority 0 and a priority 5 fallback SMTP server set up in exactly the same way, but at a different IP and location.

Accept Inbound POP3s Requests With Dovecot
We can enable POP3 to allow gmail to import mail from our Linux server into our Gmail inbox. Let’s configure Dovecot to accept these requests from Gmail.
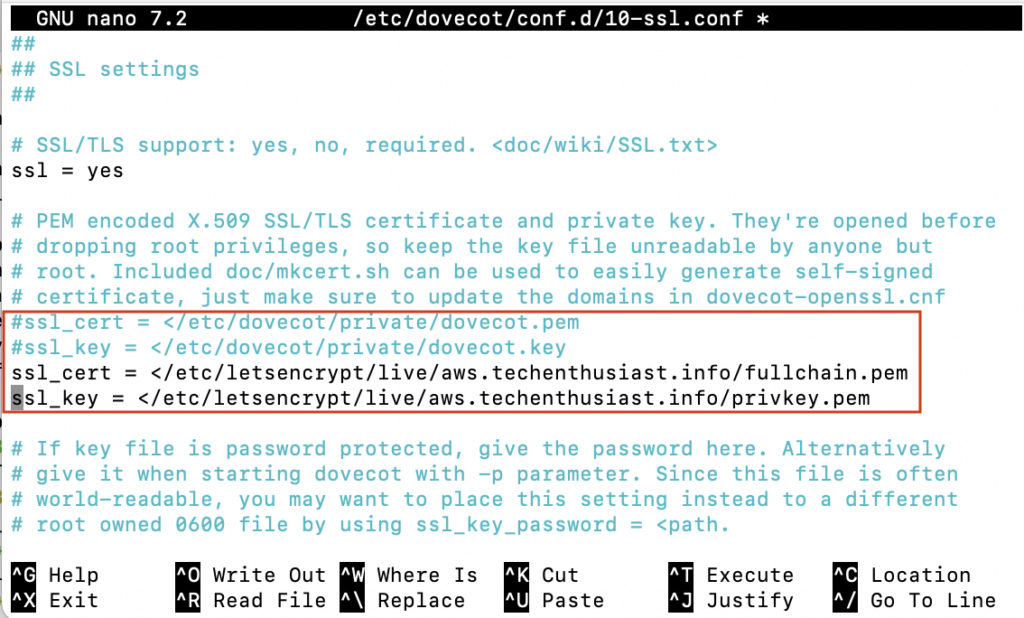
sudo nano /etc/dovecot/conf.d/10-ssl.conf
Comment out the lines ‘ssl_cert’ and ‘ssl_key’ with a ‘#’, and add two new lines below, pointing to your mail subdomain TLS certificate. In my case, this is ‘/etc/letsencrypt/live/aws.techenthusiast.info/fullchain.pem’ and ‘/etc/letsencrypt/live/aws.techenthusiast.info/privkey.pem’. note the leading ‘<‘ character which is part of Dovecot’s expected syntax.
Press ‘Ctrl + o, Enter, Ctrl + x’ to save and exit nano. Then, reload Dovecot to load in the new configuration.
sudo systemctl reload dovecot
Be sure that port 995 is accessible from the outside. If you are using AWS, the security group inbound rule will look like this.

Click Gmail -> gear in the upper right -> ‘See all settings’. Then, go to ‘Accounts and Import’ -> ‘Check mail from other accounts:’ -> ‘Add a mail Account’.
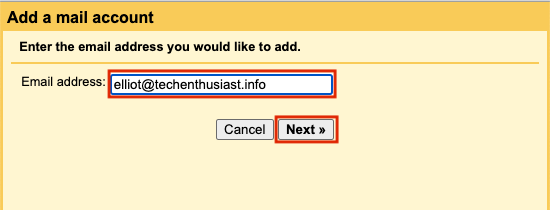
A yellow window will popup. Enter your business email and press ‘Next’.
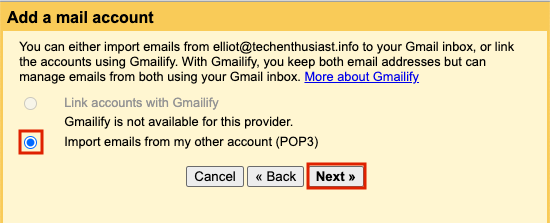
On the next screen, leave the option selected as ‘Import emails from my other account (POP3)’ and press ‘Next’.
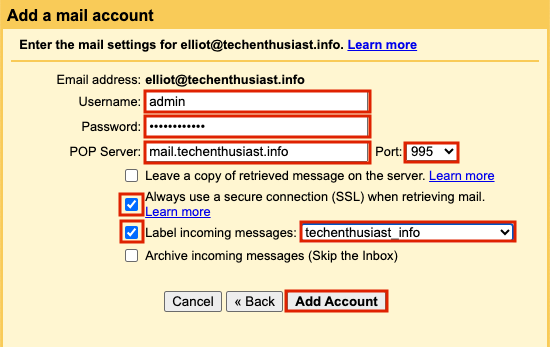
On the next screen, enter your linux username and password. Pop Server should be ‘mail.<your domain>’. Fo Port, put 995. Check the boxes ‘Always use a secure connection (SSL) when retrieving mail.’ and ‘Label incoming messages’ and for the latter, select a relevant label or create a new one. Finally, press ‘Add Account’.
If you haven’t already set up this account as a ‘Send As’ Alias Email, Gmail will guide you through that flow next. If you got back to Gmail -> gear in the upper right -> ‘See all settings’ -> ‘Accounts and Import’ -> ‘Check mail from other accounts:’, you should see your business email there, as well as the last checked time. You can click ‘check mail now’ to trigger an import.
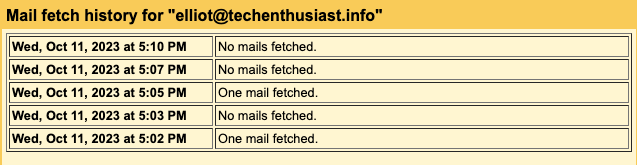
Gmail will import all mail from your postfix server, including mail sent to other usernames and other domains. Without clicking ‘Check mail now’ manually, the impot should run at least once per hour. If you click ‘View history’, you will see how often these checks have been happening.
Set Up A Backup SMTP Relay
Within /etc/postfix/main.cf, we can set the parameter ‘relayhost’ with a comma separated list of <host>:<port> values in case the primary relay goes down. Here is have added a secondary for ‘mail.smtp2go.com’.
sudo nano /etc/postfix/main.cf
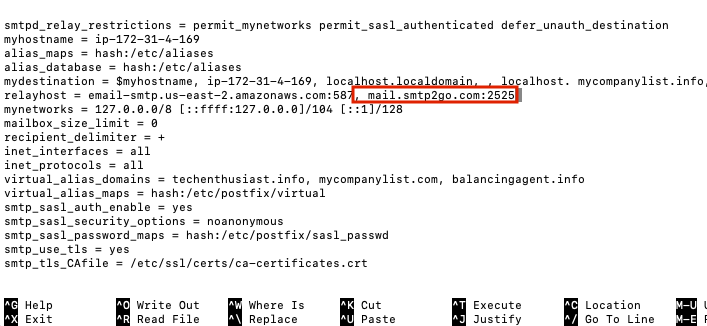
Press ‘Ctrl + o, Enter, Ctrl + x’ to save and exit nano. I also need to follow the steps here for adding credentials to /etc/postfix/sasl_passwd, postmaping those credentials, and protecting both the original and .db files. Here. is /etc/postfix/sasl_passwd looks like with a 2nd smtp server.

Common Errors And What They Mean
General Postfix Errors
Here are some messages from ‘tail /var/log/syslog -n 200 | grep postfix’ and what they mean:
Log line:
2023-10-07T00:36:35.672637+00:00 ip-172-31-4-169 postfix/smtp[19547]: B9BE6202D7: to=<elliotmacneille@gmail.com>, relay=none, delay=102, delays=12/0.05/90/0, dsn=4.4.1, status=deferred (connect to email-smtp.us-east-2.amazonaws.com[3.141.75.245]:25: Connection timed out)
Solution:
AWS throttles port 25 by default, info here. Change to port 587 or 3587 as a simple fix.
sudo nano /etc/postfix/main.cf
// modify port on 'relay host' parameter'
// Press 'Ctrl + o, Enter, Ctrl + x' to save and exit nano
sudo systemctl reload postfix
Log line:
2023-10-07T00:39:37.244182+00:00 ip-172-31-4-169 postfix/smtp[20118]: 97013202D2: to=<elliotmacneille@gmail.com>, relay=email-smtp.us-east-2.amazonaws.com[3.141.75.245]:587, delay=10, delays=10/0/0.11/0, dsn=5.0.0, status=bounced (host email-smtp.us-east-2.amazonaws.com[3.141.75.245] said: 530 Authentication required (in reply to MAIL FROM command))
Solution:
Did you property configure ‘/etc/postfix/sasl_passwd‘ and run postmap on it?
cat /etc/postfix/sasl_passwd
// fix issues
sudo postmap /etc/postfix/sasl_passwd
Log line:
2023-10-07T00:41:54.138928+00:00 ip-172-31-4-169 postfix/smtp[20526]: 1BFA1202E0: to=<elliotmacneille@gmail.com>, relay=email-smtp.us-east-2.amazonaws.com[3.15.106.14]:587, delay=8.6, delays=8.2/0.05/0.34/0, dsn=4.7.0, status=deferred (SASL authentication failed; cannot authenticate to server email-smtp.us-east-2.amazonaws.com[3.15.106.14]: no mechanism available)
Solution:
Did you install ‘libsasl2-modules’?
sudo apt-get install -y libsasl2-modules
Log line:
2023-10-07T01:40:19.109727+00:00 ip-172-31-4-169 postfix/smtp[21015]: 9F28E202C7: to=<elliotmacneille@gmail.com>, relay=email-smtp.us-east-2.amazonaws.com[18.225.16.140]:587, delay=11, delays=11/0.05/0.12/0.06, dsn=5.0.0, status=bounced (host email-smtp.us-east-2.amazonaws.com[18.225.16.140] said: 554 Message rejected: Email address is not verified. The following identities failed the check in region US-EAST-2: elliotmacneille@gmail.com (in reply to end of DATA command))
Solution:
Is your AWS SES Account still in Sandbox mode? Follow the steps here to move it into production.
Log line:
2023-10-07T00:53:38.340671+00:00 ip-172-31-4-169 postfix/smtp[20969]: 324B4202CD: to=<admin@localhost>, relay=email-smtp.us-east-2.amazonaws.com[3.141.75.245]:587, delay=0.13, delays=0/0/0.13/0, dsn=5.0.0, status=bounced (host email-smtp.us-east-2.amazonaws.com[3.141.75.245] said: 501 Invalid MAIL FROM address provided (in reply to MAIL FROM command))
Solution:
Is your AWS SES Account still in Sandbox mode? Follow the steps here to move it into production.
Otherwise, did you send the email from an address with an AWS verified identity? If not, create a verified identity for that sender, or change the sender to one that is verified with your SMTP relay provider.
Log line:
2023-10-07T02:39:16.485576+00:00 ip-172-31-4-169 postfix/smtp[21139]: 73E6B202CD: to=<root@localhost>, relay=none, delay=0.01, delays=0/0/0/0, dsn=5.4.6, status=bounced (mail for localhost loops back to myself)
Solution:
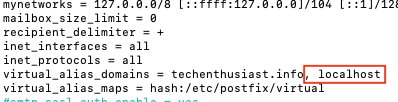
If this occurs when sending email from one linux user to another, ex root@ localhost to admin@localhost, add ‘localhost’ as a virtual_alias_domains in ‘/etc/postfix/main.cf’, as well as to your ‘/etc/postfix/virtual’
sudo nano /etc/postfix/main.cf
// add localhost as virtual_alias_domain
sudo nano /etc/postfix/virtual
// map @localhost to the relevant user
sudo postmap /etc/postfix/virtual
sudo systemctl reload postfix
// try sending email again

Gmail Errors
Creating Aliases
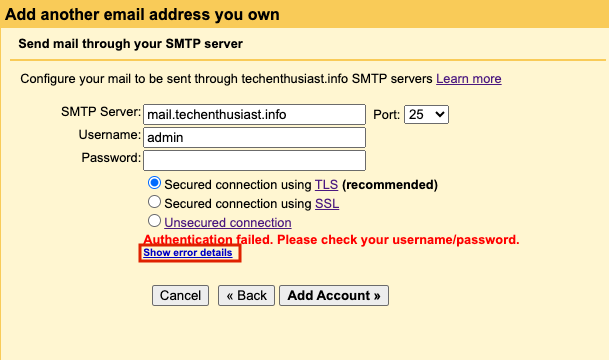
When enabling your business email as a ‘Send mail as:’ email alias, sometimes you encounter an error “Authentication failed. Please check your username/password.”. However the issue isn’t always username/password, it can be a TLS certificate issue or a Postfix/Dovecot misconfiguration. Click’ Show error details’ to see more.
Error:
Server returned error: “Unspecified Error (SENT_SECOND_EHLO): Smtp server does not advertise AUTH capability, code: 504”
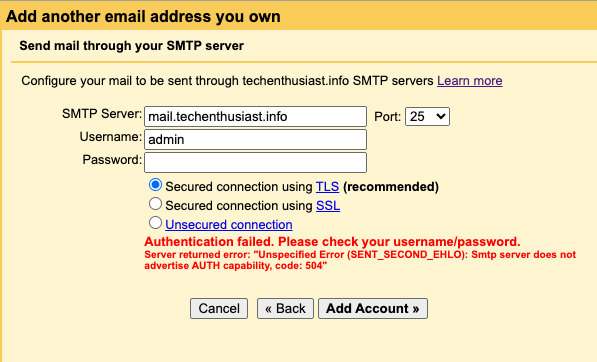
Solution:
Did you enable Postfix to use Dovecot for inbound SASL requests? Double check that you see ‘250 Auth Login’ in telnet as described here.
Error:
Server returned error: “TLS Negotiation failed, the certificate doesn’t match the host, code: 550”.
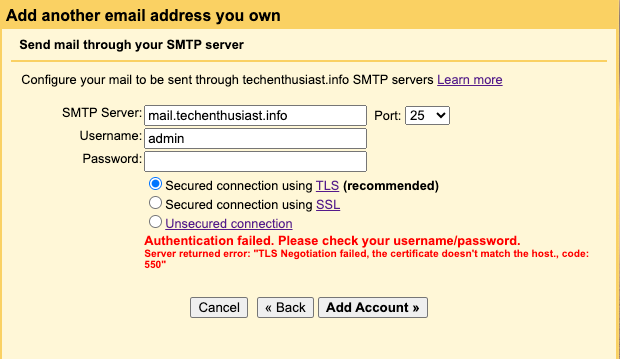
Solution:
Does /etc/postfix/main.cf have the correct TLS certificate and does that TLS certificate contain the ‘SMTP Server’ hostname you are trying to add? Revisit this step. You can also attempt to connect with an unsecured connection to ensure that everything else is correct.
Error:
Server returned error: “535 5.7.8 Error: authentication failed: , code: 535”
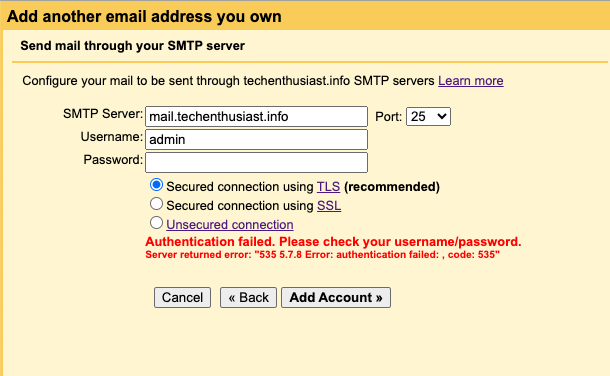
Solution:
Double check that
- The Username you entered matches a linux user
- The Password you entered matches what you set via
sudo passwd <linux username>
Try an ascii only password (just letters and numbers), and if no avail, revisit this step.
Error:
Server returned error: “DNS Error: DNS type ‘aaaa’ lookup of mail2.techenthusiast2.info responded with code NXDOMAIN DNS type ‘a’ lookup of mail2.techenthusiast2.info responded with code NXDOMAIN, code: 553”
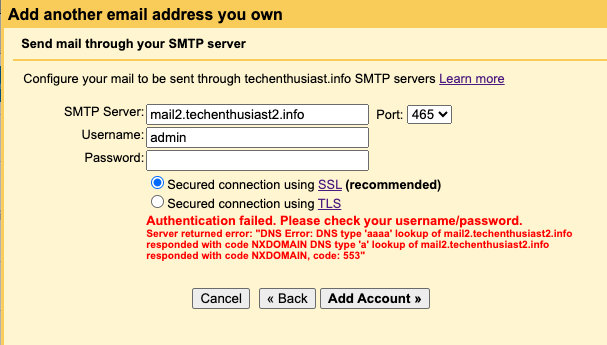
Solution:
Double check that your ‘SMTP Server’ is correct. Then, revisit this step to double check your DNS settings.
Error:
Couldn’t reach server. Please double-check the server and port number.
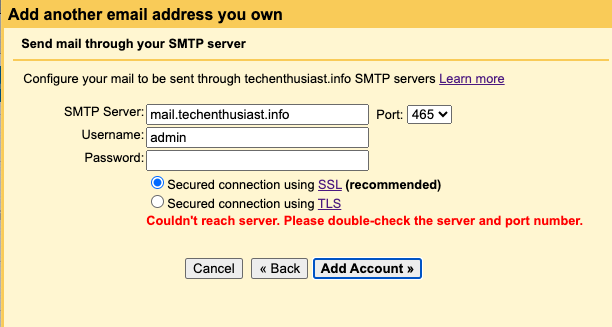
Solution:
Double check that the port you are connecting on is not blocked by your firewall/security group, and that postfix is listening on that port. Revisit this step, using a port other than 25 if that is your preference. In particular, you can use telnet from outside your server to test that the port is open and Postfix is listening.
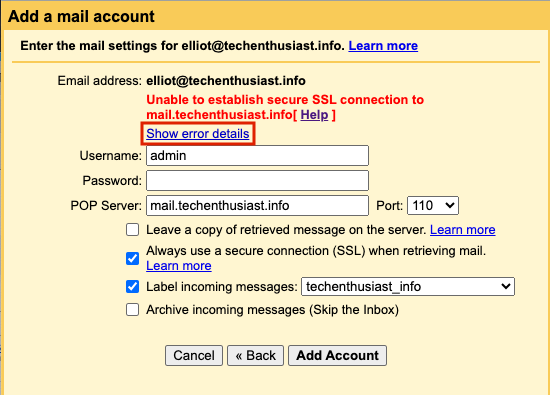
Set Up POP3
When setting up POP3s to allow Gmail to retrieve mail from your Linux server, here are some errors you may encounter. Initially, you may see ‘Unable to establish secure SSL connection to mail.<your domain>[ Help ]’. Click on ‘Show error details’.
Error:
Server returned error: “SSL error: Leaf certificate is self-signed”
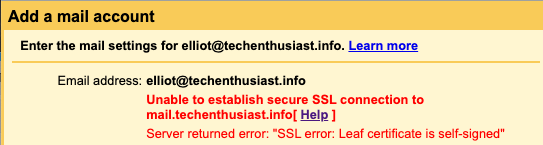
Solution:
Did you update the TLS certificate at ‘/etc/dovecot/conf.d/10-ssl.conf‘ and reload Dovecot? if not, follow the steps here.
Leave a Reply