Whether you are putting up a new website, running your own SMTP server, or transferring files via FTPS, encrypting with TLS for public connections is no longer considered optional. Generating a TLS certificate requires input from a certificate authority, which, until late 2015, costed money to do. Since then, free TLS certificates have been available via Let’s Encrypt, a non-profit TLS certificate authority and Certbot, an open source project that integrates with it. Just purchased a new domain? We will go through using GoDaddy DNS provider with Certbot on a Linux server to generate TLS certificates as well as schedule them for renewal.
- Tools
- Installation
- DNS Setup
- Ensure Port 80 Is Open
- Run Certbot Standalone
- Examine the Generated TLS Certificate
- Validate the TLS Certificate With Apache2
- More Certbot Examples
- Security Benefits of TLS
- TLS vs SSL
Tools
We will use the following tools:
- GoDaddy for purchasing a domain and as a DNS provider
- Debian Linux on a server with a static IP address
- Certbot to call out to Let’s Encrypt and generate a TLS certificate
- OpenSSL to examine the certificate
- Apache to load the TLS certificate and verify TLS on an inbound request
- A terminal and browser window on a machine separate from the Linux server for testing
Installation
This installation is specific to Debian flavors of linux like Ubuntu, Debian, and Kali. Run the following commands to install certbot.
sudo apt update
sudo apt install -y snapd
sudo snap install --classic certbot
sudo ln -s /snap/bin/certbot /usr/bin/certbot
You can check the version installed with
certbot --version
Openssl come pre installed. You can validate this and check the version by running
openssl version
New, let’s install Apache2 to help validate that the certificate is working.
sudo apt install -y apache2
We can check the version installed with
/usr/sbin/apachectl -v
DNS Setup
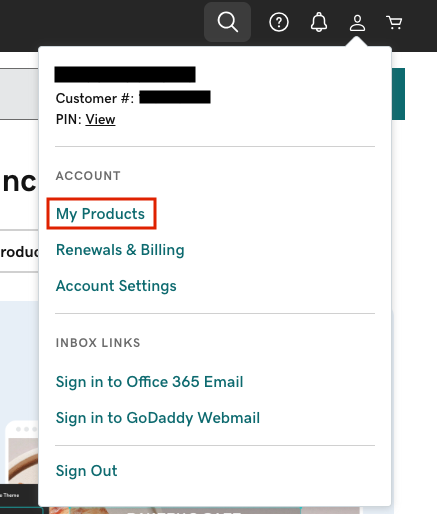
In order to use the HTTP-01 challenge, we will need to ensure our DNS is pointing to our Linux server. To do this, I log into GoDaddy, and in the upper right, select ‘My Products’.
Now, I scroll down, find the relevant domain that I previously purchased, and click ‘DNS’.

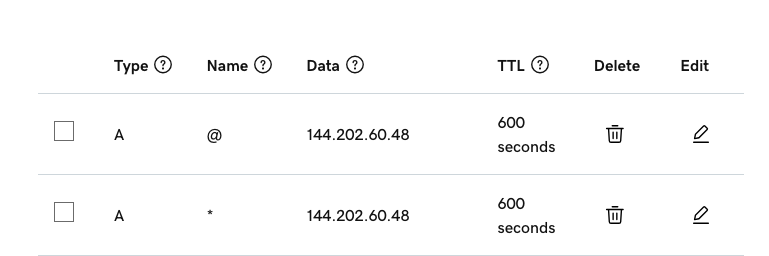
Ensure that you have two ‘A’ records pointing at your Linux server’s IP address. one for ‘@’ (root domain), and one for ‘*’ (all subdomains). You can set the TTL to as low as 600s. It is a good idea to use a low TTL initially, and then transition to a longer TTL once your setup is not likely to change. Here is what it looks like for me.
It will take a few minutes for the DNS change to be replicated to all DNS servers, and possibly longer if you previously had a different record with a long TTL. You can validate that the setup is working with the following command line commands.
host <my_domain>
host anysubdomain.<my_domain>
Here is what it looks like for me.

Ensure Port 80 Is Open
While certbot is able to integrate with running web servers without losing downtime, the simplest way to run certbot is in standalone mode on port 80. First, check that nothing else is bound to port 80.
sudo ss -tulpn | grep LISTEN | grep 80
If you followed this guide exactly, you will see that apache2 is running on port 80.

Shut down apache with the following command
sudo systemctl stop apache2
Finally, check that you are able to connect to your box over port 80. An example of this is described here.
Run Certbot Standalone
Standalone mode is useful when you don’t have any web server already listening on port 80 like Apache, Nginx, Varnish, etc. In a production environment, running in Standalone isn’t always going to be an option, because you don’t want any downtime of those service. However, it is the simplest way to begin using certbot.
You are ready to run certbot and generate TLS certificates. A full list of command line arguments can be seen here or by running
certbot --help all
Here is how you can create one TLS certificate for two hosts, the ‘aws’ and ‘mail’ subdomains of ‘<you domain>’. The ‘-v’ parameter is to get a more verbose output, and the ‘-n’ parameter means ‘noninteractive mode’.
sudo certbot certonly --standalone --agree-tos -m <your email> -v -n -d aws.<your domain>,mail.<you domain> --preferred-challenges http
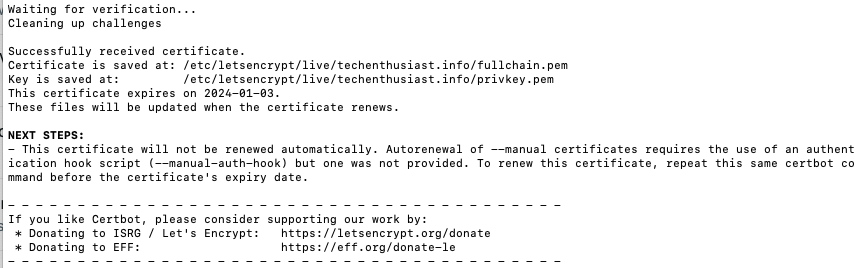
You will see an output similar to this:
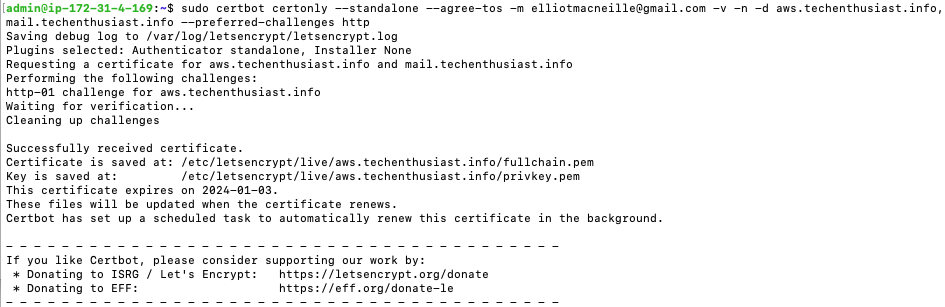
Some things to note:
- The name of the directory created matches the first domain I put in, but that certificate can also verify for ‘mail.techenthusiast.info’
- The certificate expiration date is 90 days from today
- Certbot scheduled a task to automatically renew in the background
Examine the Generated TLS Certificate
Here is a look at what was actually generated by certbot:
sudo ls /etc/letsencrypt/live/aws.<your domain>/

There are four different files. But what are they? Here is an except from the README file.
`privkey.pem`  : the private key for your certificate.
`fullchain.pem`: the certificate file used in most server software.
`chain.pem`    : used for OCSP stapling in Nginx >=1.3.7.
`cert.pem`     : will break many server configurations, and should not be used
                 without reading further documentation (see link below).
There you have it. For most usage, you will want to use ‘fullchain.pem‘ as the certificate and ‘privkey.pem‘ as the key. Something else to point out:
ls -l /etc/letsencrypt/
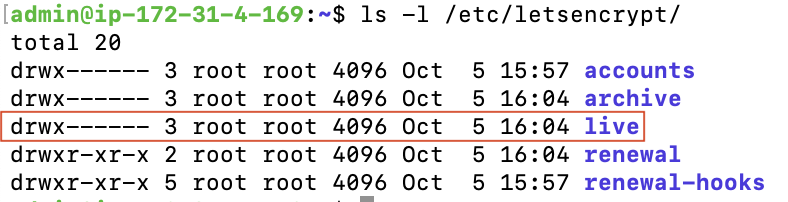
By default only root has read permission into ‘/etc/letsencrypt/live/’. This means that processes that load TLS certificates need to either be running as root, or you need to change permissions on that directory, in order for them to not get an error.
Now, let’s actually look at some of the metadata contained within the certificate. To do this, you can run:
sudo cat /etc/letsencrypt/live/aws.<your domain>/fullchain.pem | openssl x509 -inform pem -text
You get quite a bit of output. You can view the entire output here. Here are the most interesting bits:
Issuer: C = US, O = Let's Encrypt, CN = R3
We can see the certificate was generated by Let’s Encrypt.
Validity
    Not Before: Oct 5 15:04:51 2023 GMT
    Not After : Jan 3 15:04:50 2024 GMT
We can see the start and expiration date of the certificate.
X509v3 Subject Alternative Name:
    DNS:aws.techenthusiast.info, DNS:mail.techenthusiast.info
We can see all the hostnames that this certificate is able to verify.
Note that this output isn’t sensitive, because it is generated from the public certificate, not the private key. When you are running a website, this information is displayed publicly. Let’s take a look at the scheduled job certbot created.
sudo systemctl list-timers

Press ‘Ctrl + c’ to quit. Well, there you have it. By default certbot will wake up every 12 hours and see if there are any certificates to renew.
Validate the TLS Certificate With Apache2
We already installed Apache2 in the installation set. Lets start it up and verify first that we can connect on port 80.
sudo systemctl start apache2
systemctl status apache2
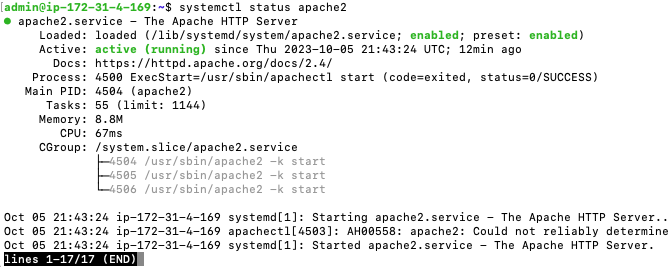
This is what a systemd service looks like when it is running correctly. So far so good. Now, let’s connect on port 80 from inside the server.
curl -I http://localhost:80
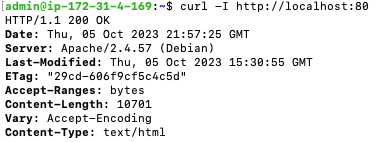
This is looking good. Not only was a connection made but a 200 response was received. Now, let’s try curling from an external server. This time we will need to use the server’s public IP, or the domain name we have pointed at this server via our DNS settings.
curl -I http://<server IP>:80
curl -I http://<my domain>:80
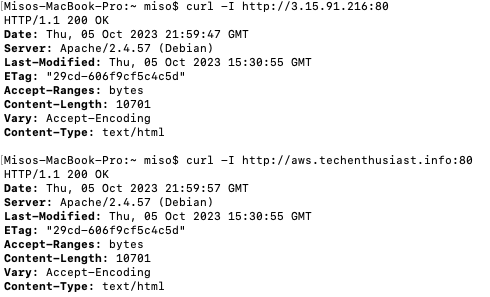
Looks like there were no security groups, firewalls, or other problems in our way from making a connection. So far so good. New let’s activate HTTPS on Apache.
sudo a2enmod ssl
sudo a2ensite default-ssl
sudo apache2ctl configtest
Now, let’s let Apache2 know where the TLS certificate is.
sudo nano /etc/apache2/sites-enabled/default-ssl.conf
Scroll down to the ‘SSLEngine’ section, comment out the lines for ‘SSLCertificateFile’ and ‘SSLCertificateKeyFile’ with a ‘#’, and type in new lines for each, pointing at the Lets Encrypt live directory, like this.
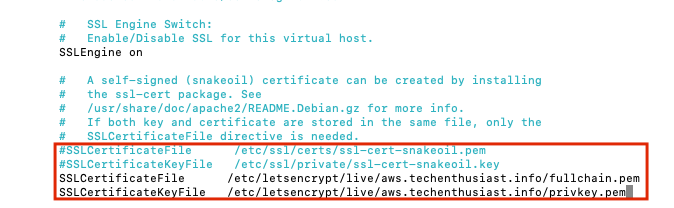
To save and quit from nano, press Ctrl + o, Enter, Ctrl + x. Finally, restart Apache2 and check the status.
sudo systemctl restart apache2
systemctl status apache2
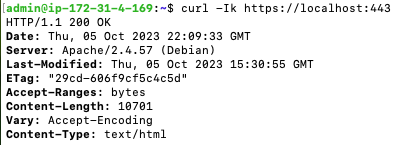
There are no critical issues, and the status is looking fine. Now we can try to connect locally, using the ‘-k’ parameter to tell curl not to validate TLS, because the hostname we are using is ‘localhost’.
curl -Ik https://localhost:443
Let’s see if we can make a TLS verified https request from the outside. Note that the server’s security group and firewall are already configured to allow inbound traffic on port 443.
curl -I https://aws.<your domain>:443
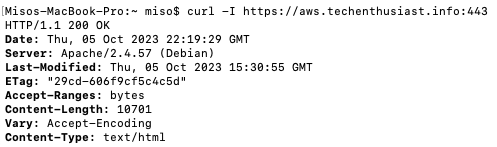
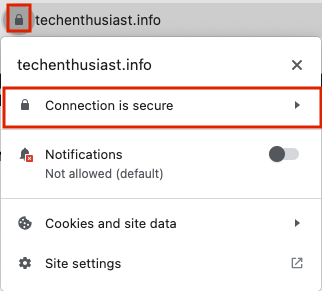
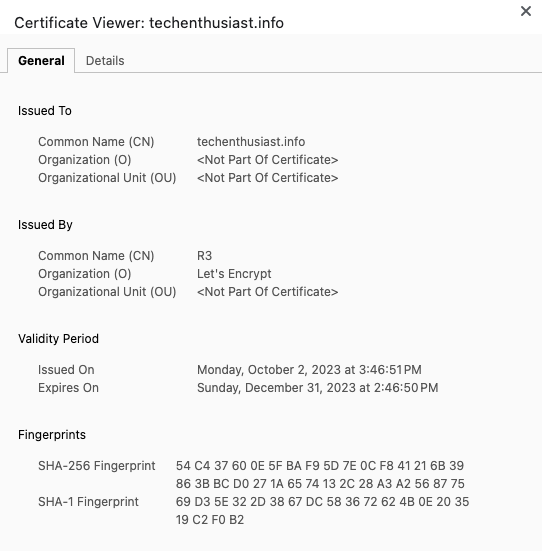
Success! Apache is able to use the certificate and key we generated to verify the server to inbound traffic. We can also visit the site in Chrome over https, and click on the lock left of the URL -> ‘Connection is secure’.
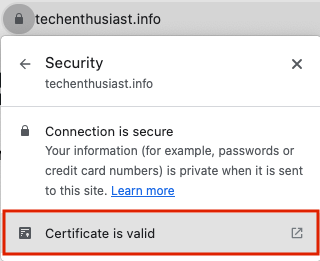
Then, click ‘Certificate is valid’.
Finally, you will see the following. This is very similar to the output we got from openssl earlier.
If you are done running Apache2, you can shut it off with
sudo systemctl stop apache2
systemctl status apache2
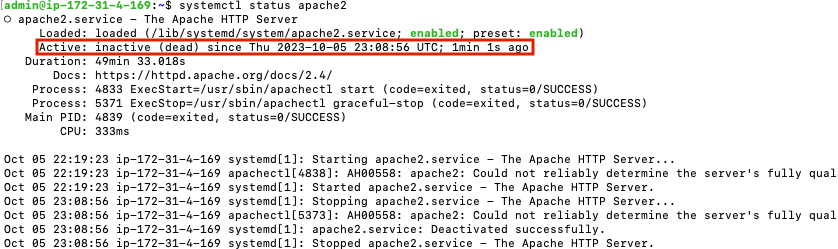
Now, Apache2 is still enabled, but status is ‘inactive’.
More Certbot Examples
Here are some additional examples of certbot commands I’ve used over time.
Using a Post Hook
In practice, we will usually want to set a --post-hook parameter to restart or reload various services that need to load the new TLS certificates after they’ve been renewed. For example:
sudo certbot certonly --standalone --agree-tos -m <your email> -v -n -d <web host>,<mail host> --post-hook "systemctl reload hitch; systemctl restart postfix"
Generating a Wildcard Certificate
A wildcard certificate, for example ‘*.example.com’, can verify any subdomain of the ending host. Note that the certificate only covers 1 level, so while ‘sub1.example.com’ would be covered, ‘sub2.sub1.example.com’ would not. Certbot does issue wildcard certs, as discussed here, however they do not allow the HTTP-01 challenge, instead requiring the DNS-01 challenge. You can install a DNS plugin to help with the automation, or run as --manual instead of --standalone, in which case you will need to add a TXT DNS record to your DNS settings in order to generate the certificate.
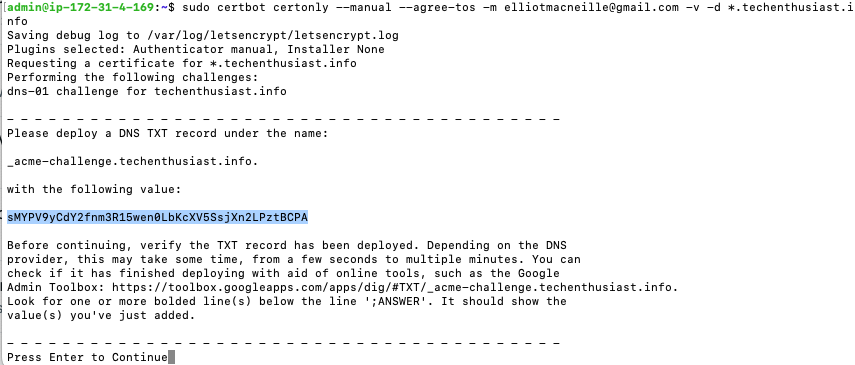
sudo certbot certonly --manual --agree-tos -m <your email> -v -d *.<your domain>
Here is a look at the initial response.
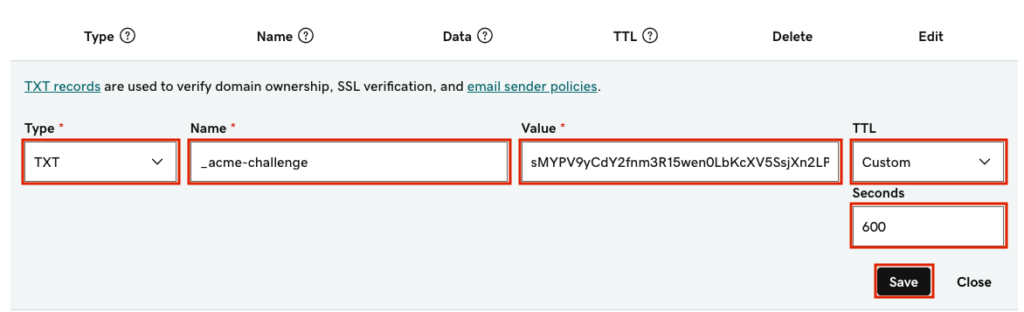
In GoDaddy DNS settings, we can add the TXT DNS record, which should look like this.
Now, let’s verify that the TXT record has had enough time to be broadcast to the world, and also that there weren’t any typos. In a different terminal:
host -t txt _acme-challenge.techenthusiast.info

Okay, now we can press enter in the certbot terminal. Certbot generated the certificate correctly, but let me know that it will not be automatically renewed.
Let’s check what the DNS name looks like inside of the certificate.
sudo cat /etc/letsencrypt/live/<your domain>/fullchain.pem | openssl x509 -inform pem -text | grep DNS

We can see that the certificate is able to verify for ‘*.techenthusiast.info’.
Certbot With Apache2 or NGINX
Certbot comes with plugins for Apache2 and NGINX. For the first parameter, instead of --standalone or --manual, use --apache or --nginx. Here is an example for apache.
sudo certbot certonly --apache --agree-tos -m <your email> -v -n -d <host 1>,<host 2> --preferred-challenges http
In my testing, if --standalone is specified but apache is running, certbot is smart enough to use the apache plugin anyway and generate the certificate.
Certbot With Varnish
Certbot does not have a built-in plugin for varnish, but we can allow varnish to proxy inbound requests to certbot in standalone mode with the following VCL.
backend certbot {
    .host = "127.0.0.1";
    .port = "8079";
}

sub vcl_recv {

    if (req.url ~ "^/.well-known/acme-challenge/") {
        set req.backend_hint = certbot;
        return (pass);
    }
}
in this example, we are expecting certbot to be running in standalone mode on port 8079. Here is the certbot command.
sudo certbot certonly --standalone --agree-tos -m <your email> -v -n -d <host 1>,<host 2> --preferred-challenges http --http-01-port 8079
Note that we are specifying a port for the HTTP-01 challenge via the parameter --http-01-port. The inbound request from Let’s Encrypt will still come on port 80, but the certbot standalone server will be listening on port 8079, right where varnish sends the request.
Forcing a Renewal
If you want to update the –post-hook, or include new hosts in a certificate, and the certificate already exists, you may get this response from certbot.

You can force a new certificate to be created by adding the ‘–force-renewal’ flag:
sudo certbot certonly --standalone --agree-tos -m <your email> -v -n -d <host 1>,<host 2> --preferred-challenges http --force-renewal
Doing a Dry Run
Let’s Encrypt imposes some rate limits described here. For example, there is a limit of 5 failed runs per hour per hostname. If you are working on developing and app that uses certbot, or jsut trying things for your first time, you can avoid these limits by specifying --dry-run.
sudo certbot certonly --standalone --agree-tos -m <your email> -v -n -d <your domain> --dry-run
Security Benefits of TLS
Why use TLS at all? TLS provides two main security advantages over plain HTTP:
- Encrypts all traffic so the contents are not known to intermediaries
- Prevents man in the middle attacks where someone is intercepting and changes messages
TLS is an asymmetric encryption algorithm, meaning everyone can see if someone is who they say they are, but only the correct person can say they are who they are. There is also a hierarchy of certificates, which means that an identity cannot be forged without forging the entire system. Without TLS, it would be impossible to check your bank account online without that data being publicly visible to the servers transferring the data between you and your bank.
TLS vs SSL
SSL is an older specification that handled the encryption for HTTPS. In 1999, SSL 3.0 was replaced by TLS 1.0 as the new standard. As spoken words, the two are interchangeable, since not everyone understands the nuance of the difference between the two.
Leave a Reply